
What seems like an eternity ago, I wrote a post on how reactive AV can be made redundant by using the application whitelisting feature in AppSense Application Manager. However, I did promise to cover it again with a step-by-step guide to creating a configuration in AM to do this, and I intend to do so now as well as providing a sample set of rules to import into your own config.
To be fair, Application Manager can do a whole lot more than just app management – greylisting, as I like to call it – and it has many more features than just the much-vaunted “AppLocker on steroids”, to use another of my favourite phrases. The Rights Management features themselves will need a whole other post to cover their capabilities, and it also has myriad other uses, amongst them Device Control and software inventory functions, which I shall also endeavour to cover in future. You’d be surprised how many environments actually have the full AppSense software suite yet only use Environment Manager. I even saw one customer who had AppSense and still used an old set of AD-based Software Restriction Policies – and given that Application Manager is streets ahead of AppLocker in features, never mind its vintage original incarnation, this choice of products simply baffled me.
But anyway – back to the case in hand, which is to provide a guide to creating an Application Manager configuration that can render your reactive AV redundant.
A quick note on this. I don’t mean removing the AV entirely – merely stopping the realtime scanning, which eats up resources on end-user systems and shared servers as it aggressively monitors each file loaded into memory. If you care about performance at all, I’d hope you’ve already got AV on your shared systems running on writes only rather than every read, if your AV vendor supports it. But if you get rid of realtime monitoring entirely and move to a scheduled scan – which should hopefully be initiated at a time when your servers are under a much lower user load – you’ll still have the comfort of knowing your systems are being checked for malware which may have flown under the radar. But if you’ve configured Application Manager well enough, there should be precious little escaping it anyway.
Application discovery
Before you begin putting the configuration together, though, it is important to run through a discovery phase that identifies the applications your users are using. I can’t stress the importance of this enough. Application Manager has a feature called Endpoint Analysis (another module I am hoping to cover in a separate post sometime) that runs in a data-gathering mode and provides information on the applications that are run and the users who run them. This can prove invaluable as a guide in the discovery phase, but there’s no substitute for good old-fashioned knowledge of the environment. Sometimes users have applications that they only run in particular situations or at particular times of the year – especially at financial year end. There is also the issue of some applications calling out to other applications or scripts, which is another side to discovery you may have to give thought to.
You don’t have to cover every application, however, but it will reduce the disruption to your users when you go live if you get the lion’s share of them added in at an early stage. Fortunately, AppSense Application Manager logs an event every time it blocks the execution of something, so you can spot false positives and react to them. It also has a Rules Analyzer that lets you identify why a particular file was blocked (again, something that’s outside the scope of this post but which I will cover in a later one).
For the purposes of this example configuration we’ll keep everything quite simple. We’ve done our application discovery and our users only need to run these applications
The Microsoft Office 2007 suite (Outlook, Excel, Word, PowerPoint and Access)
A .vbs script that remaps their printers for them if they don’t map correctly at login, stored in %systemroot%\system32
An application on a remote file share called remoteapp.exe
If only all environments were this simple 🙂 However this gives us a nice simple cross-section of applications for our example. Before we start creating the various parts of the configuration, though, we need to configure our Trusted Owners.
Trusted Ownership
If you were paying attention in my original post on this subject you’ll remember that Trusted Owners are the way that Application Manager allows a little bit of leeway in the whitelisting versus blacklisting conundrum, which is why I refer to it as greylisting. Anything on the local drives of the system is allowed to execute – but only when the owner of the file is on the Trusted Owners list. Open up the Application Manager console, make sure you are in the Configuration section and navigate to the General Features tab, then click on Trusted Owners. You should see the screen below
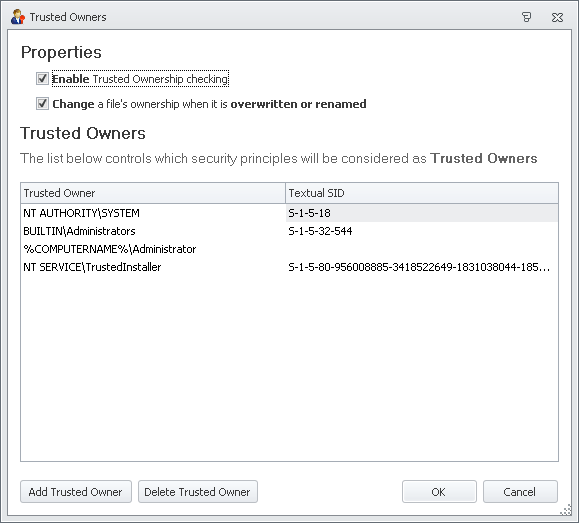
You must always ensure that Trusted Ownership Checking is turned on in the first check box, otherwise you will be exposing your systems to a high level of risk. The second check box is also very important, as if a user who is not a Trusted Owner attempts to overwrite a file which is accessible due to Trusted Ownership or an Accessible Item rule, it could constitute a security threat if the file contents have changed. Application Manager changes the ownership of an overwritten file to the user performing the action, making the file un-trusted and ensuring the system is secure. Likewise, attempts to rename a prohibited file to the name of an Accessible Item could constitute a security threat. Application Manager also changes the ownership of these files to the user who performs the rename action and ensures the file remains un-trusted. As with the first box, make sure this box is checked unless turning it off on a global basis is absolutely necessary.
The default list of Trusted Owners shown above is probably sufficient for any environment, although you can add and delete members as required. However, using Application Manager in this way means that you need to be extremely careful not to compromise the security of your local Administrators groups. Users that are inadvertently or maliciously added to these groups can execute any content, when the configuration is used as described here. Control of your local Administrators group by Group Policy Restricted Groups or Group Policy Preferences is imperative. We will quickly run through configuring the local Administrators group by using these methods in the next section, because this is fundamental to ensuring the security of the environment.
Securing your local Administrators group
The ideal way to secure your local Administrators group is through Group Policy, as it is endemic to Windows AD environments. If you don’t use AD, you may need to configure local Group Policies on your Windows systems.
Restricted Groups appear in Computer Configuration | Windows Settings | Security Settings and provide a very effective way of enforcing local group memberships. When a Restricted Group policy is enforced, any current member of a restricted group that is not on the “Members” list is removed with the exception of administrator in the Administrators group. Any user on the “Members” list which is not currently a member of the restricted group is added.
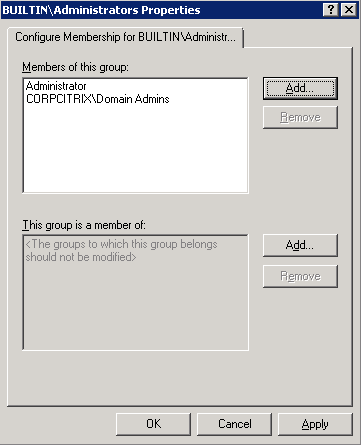 |
| Example showing the basic configuration of a Restricted Groups GPO for the local Administrators group |
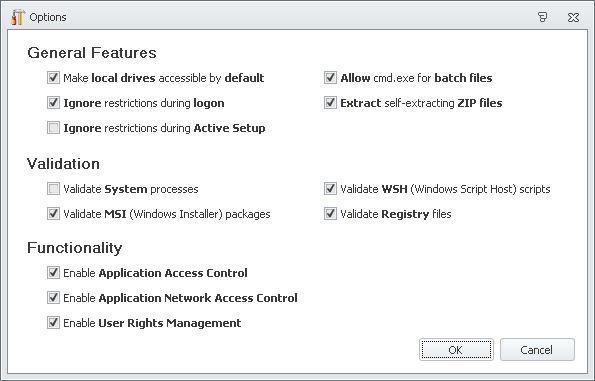
Again, you shouldn’t need to change this from the default settings unless circumstances dictate. Pay attention to the Make local drives accessible by default setting. This, combined with Trusted Ownership Checking, is what turns Application Manager from a traditional whitelist into the greylist I am so fond of mentioning.
Setting default Security Levels
We will try and keep this as simple as possible for the purposes of this demonstration, so we are simply going to work with two group rules to start with, one for Administrators, and one for Everyone. It is important to remember in Application Manager that the least restrictive set of permissions applies, so if we allow an item for Administrators and disallow it for Everyone, anyone in the Administrators group will be able to run the item. Additionally, we are going to add a couple of custom Group Rules later.
Group Rules leveraging Active Directory are the easiest and most flexible way of applying permissions, but as mentioned previously, maintaining good visibility of users who are members of these groups and keeping them updated is of paramount importance. If UserA is a member of Finance and is allowed to run sensitive financial apps, then moves to the Marketing department, they need to be removed from the AD group that allows them to run the financial apps. Ideally, this group should also control access to said apps through shortcuts, but that’s an Environment Manager consideration and out of scope for this article.
First we need to set the Security Level for Administrators. Under Rules | Group, browse to the group marked BUILTIN\Administrators. (The Administrators and Everyone groups are already created for you, but you can simply add new groups by right-clicking Group and choosing Add Group Rule, before browsing to the group or entering it manually)
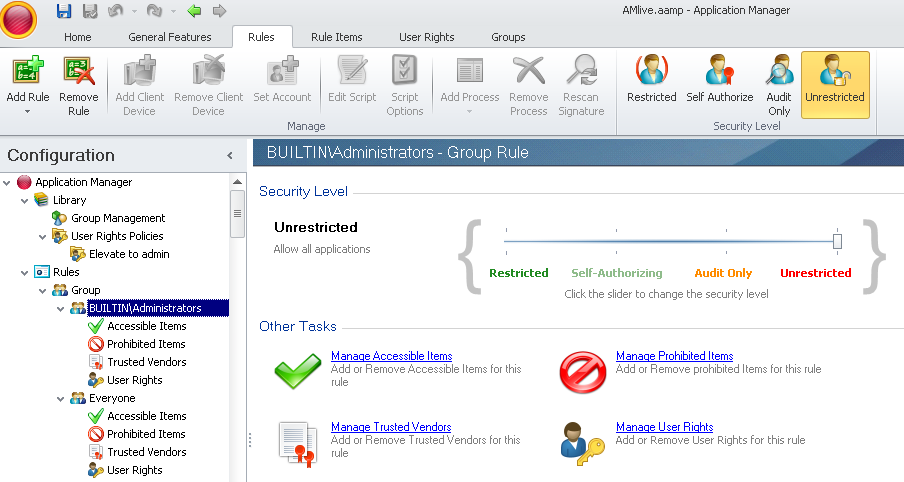
By default Administrators is set to Unrestricted which is what we want. You change the value for the Security Level by either moving the slider or clicking on the buttons shown in the top right of the image above. Other settings such as Self-Authorize and Audit Only will be discussed in a separate post. For now we are going to concentrate on the basic ones.
Perform the same checks as specified above on the Everyone group and you should see the Security Level is set by default to Restricted, which is again what we want.
Setting default Prohibited Items for Everyone group
Now, let’s have a think about how our configuration works at the moment. Everything on local drives can run by default, if it is owned by a Trusted Owner. Let’s remind ourselves of the reason behind this. If a Trusted Owner (i.e. a local admin) comes along and installs a new program, they will be the owner of those files and folders, so the new program will be allowed to execute for the users without anything needing to be updated. Conversely, any malware dropped by the user into a user-writable area (such as the user’s profile or temp area) will be owned by the user (who is not a Trusted Owner) and therefore blocked from execution. All well and good – no need for updates when programs are installed or patched, no user-introduced malware can execute.
However, because everything local is allowed by default if owned by a Trusted Owner, does that mean a user could, for instance, run Windows PowerShell? Indeed it does. The PowerShell executable, powershell.exe, will be owned by a Trusted Owner and therefore the user could execute it by simply typing powershell into a Run command or clicking the shortcut. Now, you could hide the shortcuts and Run commands by any number of means, but this is an unsatisfactory way of disallowing the application as there are many other ways users could circumvent these restrictions (such as creating new shortcuts). What we need to do is block them completely.
The way to do this is to enter any local applications that you wish to disallow from execution by a non-admin user into the Prohibited Items section of the Everyone group. Prohibiting an item trumps any allows of it assigned to the same group, so if you added PowerShell as an Accessible Item as well as a Prohibited Item for Everyone then it would still be blocked from execution.
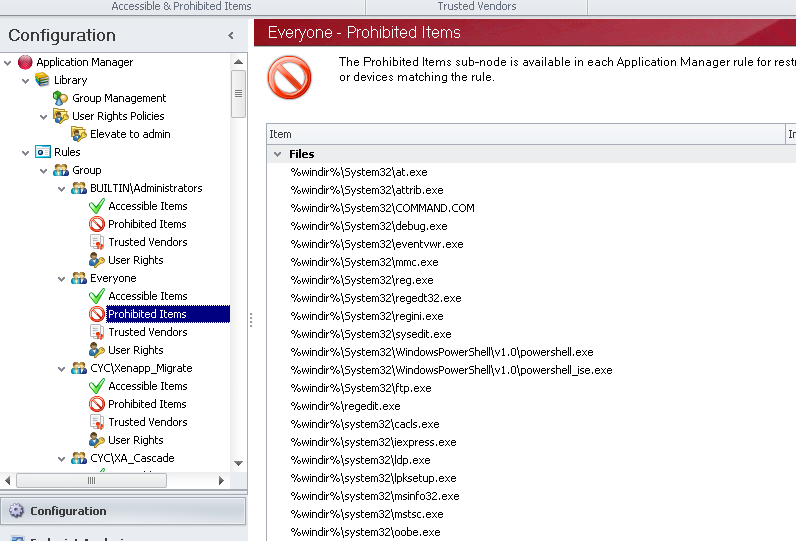
Now, to give you a good starting point without having to rake through your Windows systems and find all the natively-installed apps that you’d rather the users didn’t execute, I’ve put a common list of Prohibited Items for the Everyone group in the next section. This list was pulled from a Windows 2008 R2 XenApp 6 server, so may not be strictly correct for other client types. Note the use of the sys* wildcard folder name – this is to capture executables that may be found in %windir%\syswow64 as well as %windir%\system32, as 2008 R2 is a natively x64 system. (If you don’t want to cut and paste these in, you can download a copy of the sample configuration, see link at the end)
%windir%\sys*\at.exe
%windir%\sys*\attrib.exe
%windir%\sys*\command.com
%windir%\sys*\cmd.exe
%windir%\sys*\cscript.exe
%windir%\sys*\eventvwr.exe
%windir%\sys*\mmc.exe
%windir%\sys*\reg.exe
%windir%\regedit.exe
%windir%\sys*\regedt32.exe
%windir%\sys*\regini.exe
%windir%\sys*\sysedit.exe
%windir%\sys*\WindowsPowerShell\v*\powershell*.exe
%windir%\sys*\ftp.exe
%windir%\sys*\*cacls.exe
%windir%\sys*\iexpress.exe
%windir%\sys*\ldp.exe
%windir%\sys*\lpksetup.exe
%windir%\sys*\msinfo32.exe
%windir%\sys*\mstsc.exe
%windir%\sys*\oobe.exe
%windir%\sys*\perfmon.exe
%windir%\sys*\ProvisionShare.exe
%windir%\sys*\ProvisionStorage.exe
%windir%\sys*\rekeywiz.exe
%windir%\sys*\resmon.exe
%windir%\sys*\scw.exe
%windir%\sys*\scwviewer.exe
%windir%\sys*\secedit.exe
%windir%\sys*\ServerManagerLauncher.exe
%windir%\sys*\shrpubw.exe
%windir%\sys*\sigverif.exe
%windir%\sys*\syskey.exe
%windir%\sys*\SystemProperties*.exe
%windir%\sys*\telnet.exe
%windir%\sys*\TSAppInstall.exe
%windir%\sys*\UserAccountControlSettings.exe
%windir%\sys*\winver.exe
%windir%\sys*\wscript.exe
This list is by no means exhaustive, but should give you a good idea of what sort of things you may need to exclude to keep your users from getting themselves into trouble. If you have something in this list that a particular AD group need to run (such as the RDP client, mstsc.exe), you don’t need to remove it here. Simply create a new group rule for the user group and add mstsc.exe to the Accessible Items section. If, as noted earlier, the same app is referenced in two group rules, then the most permissive one applies.
Another thing to note – you don’t have to use the full path when specifying an item in Application Manager, you could just use the executable name, but the full path is better as it provides more precision. When working with things like App-V apps, though, you may have to use the name only.
If you look in the Accessible Items section under Everyone you will see some default allowed items as shown below. If you need to, you could add some other Accessible Items here, but most applications are best tied to a separate group rule. If you do need to allow something on a global level, however, this would be the place to define it.
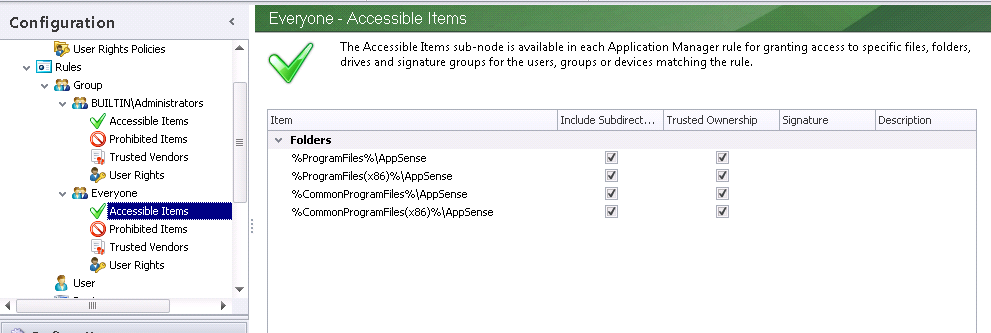
Note the check boxes for Trusted Ownership and Include Subfolders. Be very careful if you ever decide to turn off Trusted Ownership checking for particular files, folders or drives. If you have files that will not execute due to Trusted Ownership, it is often better to change the owner to a Trusted Owner using the GUI, subinacl.exe or a script rather than turning this off. In some cases, though (such as software that drops executable files into the user profile) you may need to turn this off. To preserve the highest level of security, be as precise as possible with the name of the file or folder. Opening up a high-level folder and subdirectories in this fashion is definitely to be avoided.
Setting up new group rules
Now we need to allow the execution of the applications that our users need to use for their daily jobs, using the list that we defined in our application discovery phase. We don’t want to add these to the Everyone group as we want to allow application access based on the user’s Active Directory security group memberships, which is a good way of ensuring that users can only execute those programs that they are expressly authorized to.
The first applications the users need are the applications in the Microsoft Office 2007 suite. These apps are installed locally onto the XenApp servers our users access the system through. Do we need to set up a Group Rule for this?
If you’ve been paying attention you will know that the answer is no. Office 2007 is locally installed, it was installed by a local administrator so it will pass Trusted Ownership Checking, so we don’t need to do anything. It is allowed unless we have specifically set up a rule prohibiting it, which we haven’t.
The next application they need to use is a VBScript called %windir%\system32\MapPrinters.vbs. This file is also owned by a Trusted Owner, so will we need to set up a Group Rule for this?
Have you been paying attention? The answer is yes. The file is owned by a Trusted Owner, and it’s local – so why won’t it execute by default?
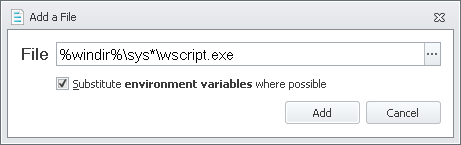
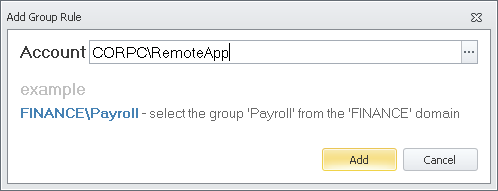
Well, it would have executed by default, if it wasn’t for the Prohibited Items we have already set up. VBScripts use the wscript or cscript command interpreters to execute, and we explicitly prohibited these for the Everyone group. So we need to set up a new Group Rule. Right-click Group and choose Add Group Rule
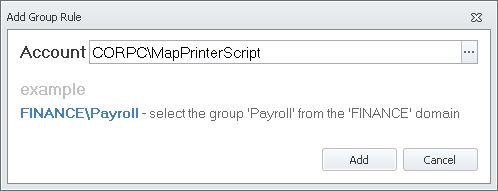
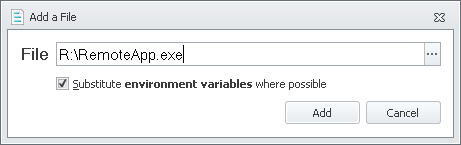
Once you have added this rule, right-click in the Accessible Items section and choose Add Item | Accessible | File
That’s all we need to do to allow the script file – now, if you are in the CORPC\MapPrinterScript AD security group, the file will be allowed to execute.
Finally, our users need to execute the application from a remote file share called remoteapp.exe. Our Environment Manager configuration maps our users an R: drive to the file share, and the application sits on the root. So will we need to make a Group Rule to allow R:\remoteapp.exe to run?
The answer of course is yes, this is a remote, not local, file and as such it is disallowed by default, even if Trusted Ownership Checking passes OK. The Trusted Owner check must be matched by an Accessible Item rule if the file is stored remotely. This adds another level of security to the configuration.
You should be getting the hang of this bit now (and you’ll be doing a lot more of it if you decide to put all of your user apps in this configuration, I can guarantee it) so we need to create another Group Rule for an AD security group
And then add the path for the file we wish to allow to Accessible Items for this Group Rule
Just as an example, if there were ten files in the R: drive that we wished to allow to execute and no subfolders, how could we allow them all to execute with a single rule? We could set up a rule for
R:\*.exe
Or set up a drive item rather than a file item, that simply pointed to R:
Either way this would work, but as you are opening up a fairly broad spectrum rule, again, exercise some caution.
Testing the rules
Now we’re all set – we have set up Group Rules to let our users execute the apps they need, we have disallowed the local files we only want admins to use, and we have saved and deployed our configuration to our XenApp servers. Now we just need to see them in action and verify that nothing gets through.
We are going to download the EICAR test string to our systems and put this inside a text file which we will then rename badapp.bat. We will then copy this locally and try to execute it. The AV should pick the file up when it executes, so we’ll see which catches it first, AV or Application Manager.
So, we open up a desktop to our XenApp server, browse to the local drive, and execute badapp.bat. What do we see?

There’s the proof. AppSense Application Manager’s filter driver has intercepted the call for execution to the kernel before it has actually executed, therefore the AV has been rendered useless. As the application is not on the list of Accessible Items for the user, the execution has been stopped, and AV has not even had a chance to enter the equation. (This test may not work for a lot of AV, which will identify the EICAR file as it is written to the disk and remove it or flag it. To get a true test, you’d need to shut down the realtime monitor, copy the EICAR file to the disk, and then restart the realtime monitor before trying to execute it. However, even if your AV gets to it before Application Manager does, remember that AV is generally reactive, and may not know about some viruses – but Application Manager will block them all, known or unknown)
If you open the AppSense Management Console and browse to the Alerts section, you will see all blocked content displayed as individual alerts, telling you the date and time, userid, executable path and session host. These can be used to see what users have been trying to execute (which will surprise you!), and identify any false positives, possibly with the help of the Rules Analyzer, which I will cover in another post.
The only caveat to this approach is that in this configuration, local Administrators can execute anything. Can you trust your local admins not to be browsing unsafe web sites from server RDP sessions or opening unsafe email attachments? If the answer is yes, then this configuration will definitely go a long way towards removing the long-standing need to maintain realtime AV monitoring that sucks up valuable CPU and memory resources on your long-suffering shared servers. If the answer to that question is no, you will need to switch the Security Level for Administrators to Restricted and treat them in the same way you treat normal users – but really, if the answer is no, you have far bigger problems on your hand than addressing resource issues by shutting down AV.
So, we’ve covered all the bases in a very simple AppSense Application Manager greylisting configuration. As mentioned earlier, there are lots of other excellent features in this product that I will be covering in future posts, but hopefully this should give you a nudge towards using this part of it instead of, or at least alongside, your current choice of antivirus.
If you would like to use the sample configuration provided in this post as a starting point for your own, you can download it HERE. Don’t forget you’ll need to alter the custom Group Rules to match your own security groups.
Thanks to Dave Andrew for providing configs to me and saving the reinvention of the wheel.

