Unlike those referred to in some of the posts I’ve written previously, in some environments, IT departments are actually quite nice to their users. 🙂 This means trying as hard as humanly possible to save their customized settings for them, in order to allow them to be more productive.
One of the main requests I get, now that Windows 7/2008 R2 is fairly commonplace, centres around User Pinned items and Jump Lists. Users can pin items to the Taskbar or Start Menu, making them easy to launch. They also can use Jump Lists for items related to the application – for instance, when you right-click an Internet Explorer item pinned to the Taskbar, the Jump List shows you a list of recently-used websites. Both these features are handy for users and part of the reason Windows 7/2008 R2 have become popular. If you are using Personalization and/or the sort of profiles that are discarded at logoff time, though, you may, rather annoyingly, find that a default EM deployment isn’t set up to save the changes users make to these areas. (See Note #3 at the end of the article if you are using Environment Manager version 8.3 and up – these settings are now captured by Personalization directly)
So what do we need to configure in AppSense Environment Manager to capture these settings for our users without any fuss? There are a mix of Registry settings and files/folders concerned with these settings, so you can do some of them in Personalization Server, and the others with a few actions in Environment Manager.
The folders that need to be saved are
%AppData%\Microsoft\Internet Explorer\Quick Launch\User Pinned\StartMenu
%AppData%\Microsoft\Internet Explorer\Quick Launch\User Pinned\Taskbar
%APPDATA%\Microsoft\Windows\Recent\AutomaticDestinations
%APPDATA%\Microsoft\Windows\Recent\CustomDestinations
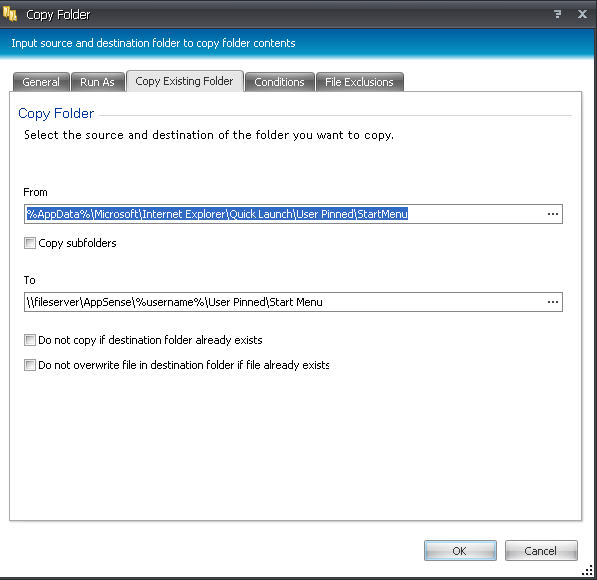
Now, those of you with your thinking caps on will be only too aware that you can’t save files and folders into Session Data in Personalization Server, and because these settings are related to the shell rather than a specific application, you can’t capture them on a process basis. Maybe in a future version of EM PS we might see the ability to capture files and folders into Session Data, but until then, we will need to configure a number of Logon and Logoff actions. You’ll need to use Action | File & Folder | Folder Copy
Here’s the first Logoff Action, this one is for User Pinned items on the Start Menu. Note there are also no conditions or exclusions configured.
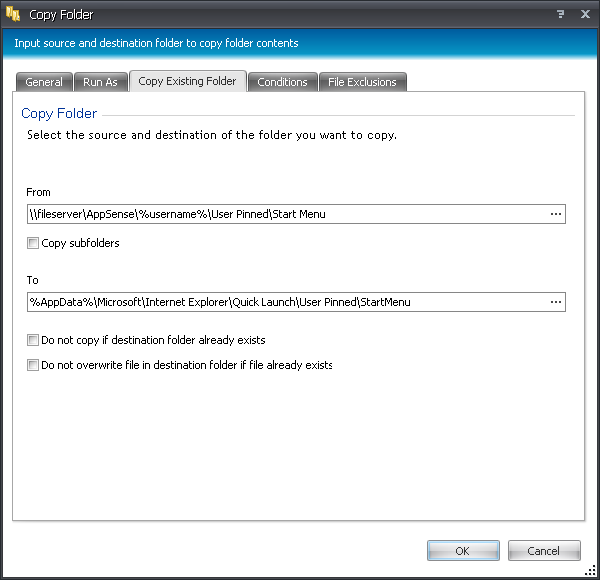
And here’s the complementary Action in the Logon trigger, simply reversing the process
Time to get interactive! You’ll need to also configure actions for the Taskbar User Pinned items, and there are also a couple of folders you’ll need to capture for Jump Lists, so using the two example Actions above as a template, see if you can configure yourself some Folder Copy actions for the other three paths you need to save (I’ve reproduced them below). Each path will need a corresponding Action in the Logon and Logoff triggers as we’ve already shown
%AppData%\Microsoft\Internet Explorer\Quick Launch\User Pinned\Taskbar
%APPDATA%\Microsoft\Windows\Recent\AutomaticDestinations
%APPDATA%\Microsoft\Windows\Recent\CustomDestinations
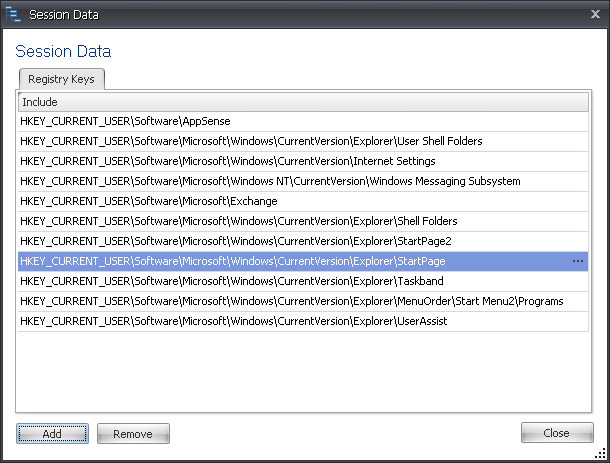
That’s all we need to configure for our files and folders – the rest of the settings are Registry keys. So if you are using Personalization Server (and let’s face it, why wouldn’t you?) it’s a simple matter of adding the following keys to Session Data. Once you’re in the User Personalization area, click on the Tools menu, and hit the button marked Session Data, from where you can add these keys
HKEY_CURRENT_USER\Software\Microsoft\Windows\CurrentVersion\Explorer\StartPage2
HKEY_CURRENT_USER\Software\Microsoft\Windows\CurrentVersion\Explorer\StartPage
HKEY_CURRENT_USER\Software\Microsoft\Windows\CurrentVersion\Explorer\Taskband
HKEY_CURRENT_USER\Software\Microsoft\Windows\CurrentVersion\Explorer\MenuOrder\Start Menu2\Programs
HKEY_CURRENT_USER\Software\Microsoft\Windows\CurrentVersion\Explorer\UserAssist
Now your Session Data settings (assuming you haven’t already added or removed any) will look like this
Once you have added these settings to Personalization, you just need to save and deploy your configuration as normal, and your users should be ready to test it. And you should see that now all their lovely Pinned Items and Jump Lists are available in all their glory 🙂
Note #1 – if you aren’t using Personalization, you’ll need to configure Registry hiving for the keys that were added to Session Data. I’ll cover hiving in a later post, but it’s fairly straightforward and not entirely dissimilar to the Folder Copy actions described earlier. It’s found under Action | Registry | Registry Hiving
Note #2 – if you are using App-V or Citrix Streaming to deliver apps, then Pinned Items may be a little haphazard, particularly with regard to icons. This is also something I will cover in a later post, as there are a few areas you may need to add to the above routines in order to get it to work satisfactorily.
Note #3 – AppSense Environment Manager 8.3 and up capture these settings into User Personalization directly and can be configured through the Desktop Settings area of your Personalization Server or Personalization Group. So unless you are using a version of AppSense EM prior to 8.3, the above set of directions should now be pretty much superseded.

