
One of the key areas I am concentrating on for 2018 is automation. With the advent of hybrid cloud services that mix traditional on-premises infrastructure with SaaS, IaaS and PaaS, it is critically important that we avoid an unsustainable rise in administrative tasks by doing as much automation as possible. Hopefully, I’m going to write a series of blog articles that deal with ways you can automate some of your common tasks and manage your evolving systems much more effectively.
Active Directory
AD, and ADFS, are probably one of the most admin-intensive areas of your enterprise. It’s here that many configuration settings are defined and modified, often in quite high volumes. Many companies I work alongside have either manual processes for AD admin tasks, which are time-consuming and can introduce user errors if anything is missed, or have scripted their way around some of the admin tasks, which also brings an overhead of maintenance of the scripts that necessitates resources be assigned to it.
When it comes to automating within AD or ADFS, I like to use Softerra’s Adaxes product to enable this. It has a huge amount of automation and extension power tied up in a straightforward GUI interface, and the advantages it gives in removing labour-intensive tasks, and extending AD functionality, more than make it worth the investment. There are a huge amount of things you can do with it (I am going to have to do a quite a few blog articles to cover all the bits I like!), and I’m not going to list them all here – we can cover them off one by one. An example of how it also extends AD functionality is the concept of a “Business Unit”, which gets around the limitations of Organizational Units that often plague administrators.
User provisioning
Provisioning of new users is often a long-winded manual process that involves a lot of specific actions. In the brave new world of cloud services, we can use not just group memberships and built-in AD attributes to provide access, we can use customized AD attributes as well (such as in claims-based access). If you’ve embraced these methods, then you will be aware that any mistake at the user provisioning stage can result in a bad experience for the user. For instance, in my current project I see a lot of service desk calls because new users haven’t been added to the right group, or had their profile path set, or don’t have a telephone number set on their user object. Because these attributes drive access to applications and services, new users have a frustrating time trying to get up and running. The only way to avoid these issues is to have a robust, automated provisioning process, and Adaxes can help us drive that through with no mistakes, giving us much happier users and freeing up time for staff to deal with other things.
Let’s just run through an example of using Adaxes to provision new users in my lab domain.
Initial configuration
Obviously you need to install the Adaxes sofware somewhere! 🙂 It doesn’t have to be onto a domain controller, although there is no reason why you could not do it this way if you want to. I used a dedicated application server, but given that it is simply a web service that integrates with Active Directory, it could easily be piggybacked onto another lightweight app server. Resiliency can be provided in a number of common ways – something I will cover at a later date.
You simply run the installer, select the components you need (there are self-service aspects to the software as well, again which I will cover at a later date), and provide a service account that has the right to Create all child objects and Delete all child objects in AD. That’s it! Once you’ve done that, simply connect it to your domain, run the console, and you’re ready to rock.
An important point though, in order for the Adaxes rules to work properly new objects need to be created in the Adaxes console rather than dsa.msc (AD Users and Computers) or AD Admin Center. So you really should install at least the console onto domain controllers for your users to use, if they’re in the habit of running it from there. The Adaxes AD console is very similar to ADUC, though, so there is no training needed or familiarisation. There is also an enormous amount of delegation you can do through the Adaxes console, so you should gain from using it for AD management anyway!
Requirements
OK, to demonstrate the provisioning process in action, we are going to list our requirements for new users. They’re probably fairly simple compared to the average enterprise, but they should be enough to give you an idea of what is possible.
When a new user is created, I would like to:-
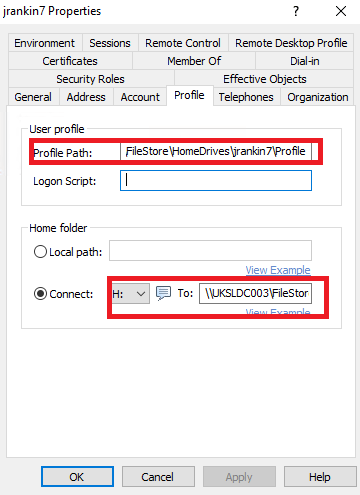
Create a home drive pointing to \\UKSLDC003\FileStore\HomeDrives\%username%
Set the permissions on this home folder so the user has Full Control
Map this home drive to H: on the AD user object
Set the Remote Desktop Services profile path to \\UKSLDC003\FileStore\Mandatory (RDSH sessions use a mandatory profile)
Set the Profile Path to \\UKSLDC003\FileStore\HomeDrives\%username%\Profile (for a roaming profile on desktops)
If the user is in the Power Users OU, assign it to the Group SW_Set1 (which deploys software for the user)
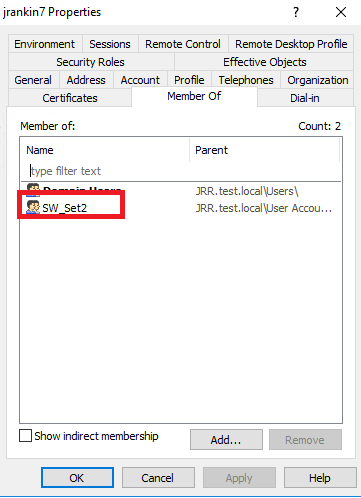
If the user is in the Standard Users OU, assign it to the Group SW_Set2 (which deploys software for the user)
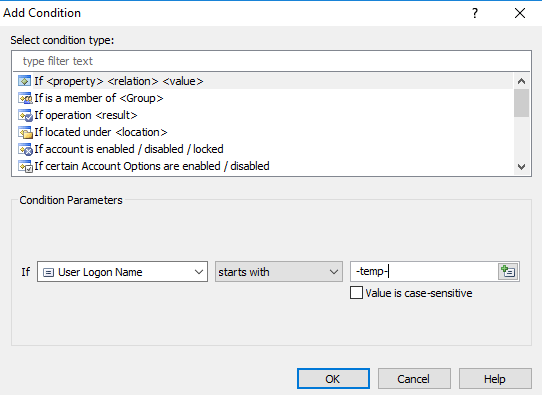
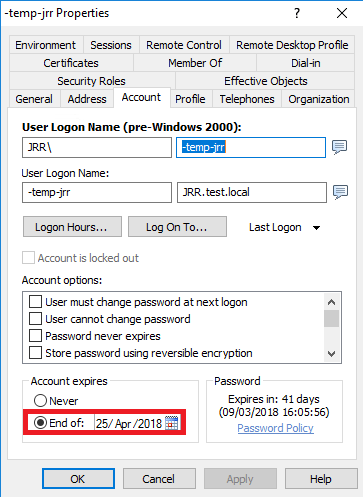
If the username begins with the prefix -temp-, assign an expiry date three months in the future
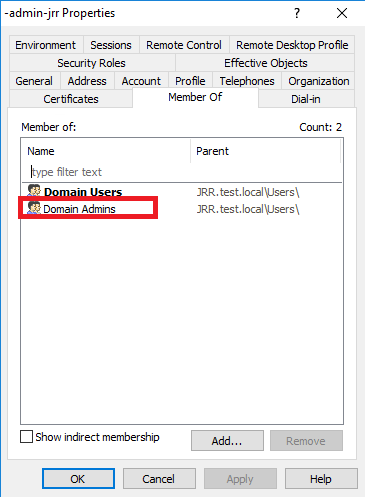
If the username begins with the prefix -admin-, add it to the Domain Admins group
In normal operation, this would have to be done specifically by first-line support by following a process (although normally you find service desks simply use the Copy function to avoid some of this, which introduces its own set of security and operational problems). But in this case, we’re going to automate it all (hopefully!)
We are going to divide this into a couple of areas. The first is a set of actions that run after the user object is created. The second will be actions that run when an OU is updated.
Create a Business Rule that will run after a user is created. There is a built-in one provided, but we will create it from scratch

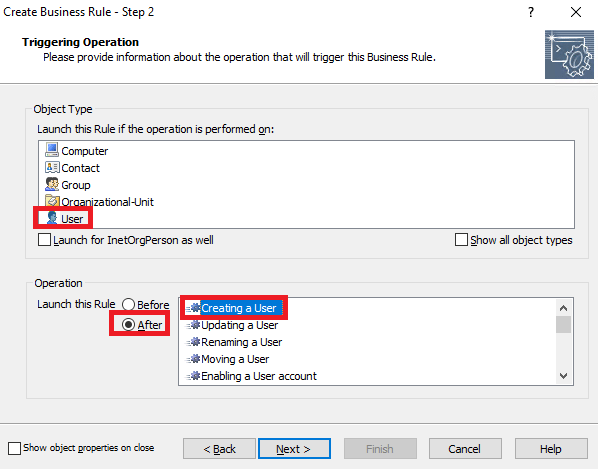
The rule should then be scoped to the precise target event that is required, which in this case is to be run after a new user is created

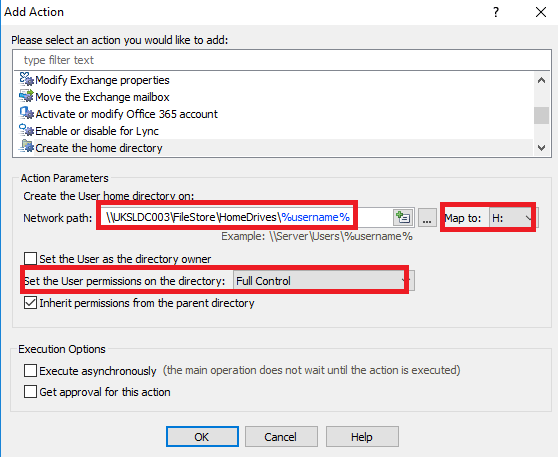
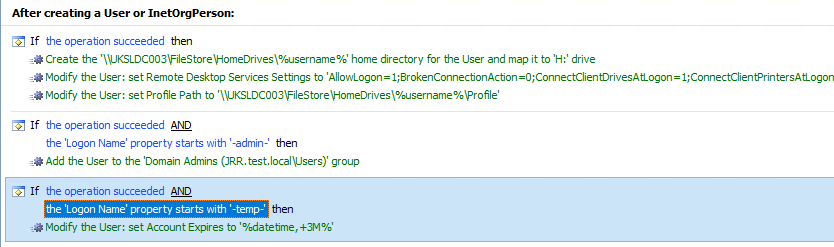
Next, we need to assign the Actions that we want to take place after a new user is created. So, we will start with the mapping of a home drive, and the setting of the required permissions. This is all done by interfacing directly with the functions in Active Directory itself.
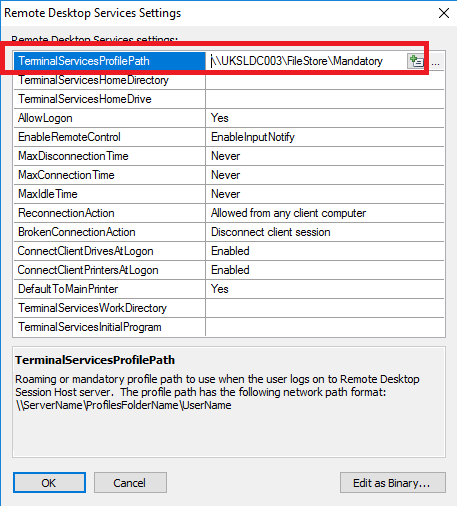
And now we can add the next requirement for an Action, which is setting the Remote Desktop Services profile path to a specific area, to pick up a mandatory profile when using RDSH. You choose an Action of “Update user”, click Add, choose Remote Desktop Services Settings from the list, click on the button next to Update value, and enter the profile path in the correct field
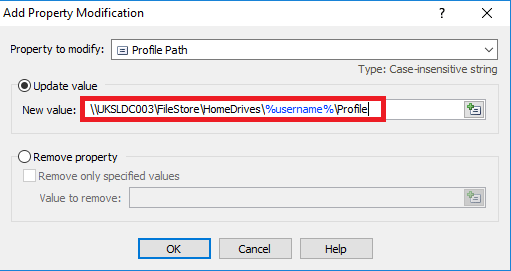
You can also use the same Update user function to update the non-RDSH Profile Path setting which we have as a requirement. Choose Profile Path and enter the required path in the field
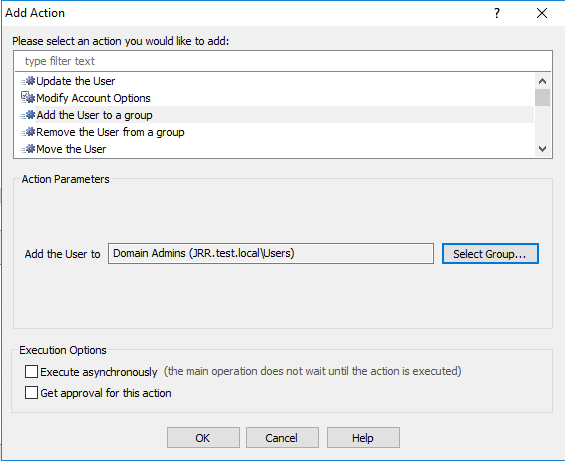
Now, to set the user group memberships based around the prefix of the user logon name, firstly, click on Add Action To A New Set. Set up an Action for, in this case, adding the user to the Domain Admins group.
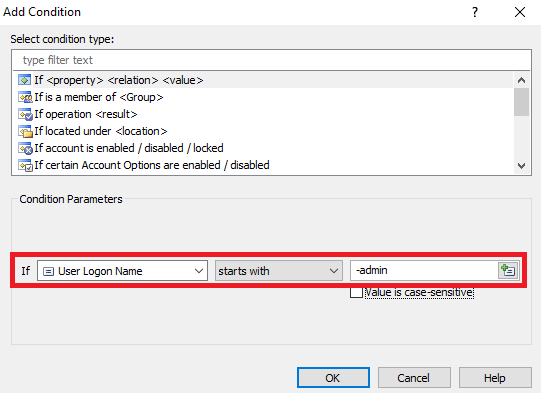
Now, simply add an additional “AND” Condition to the newly-created second set, so that this will only apply when the user is created AND if the username matches a defined format. Firstly, we will create one for the prefix of “-admin-“. Right-click on “If the operation succeeded” in the right-hand pane, and choose “If <Property> <Relation> <Value>” and populate as required
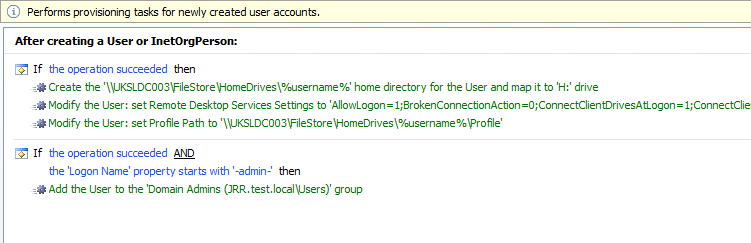
You should now have two sets of Conditions and Actions in the Business Rule as shown here, one for new user creation in general, and one with an AND clause to check if the user also matches the prefix pattern
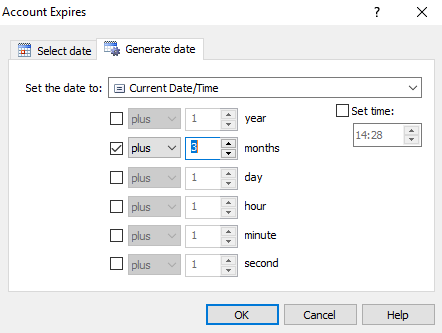
Now we can simply repeat the previous couple of steps to set a specific account expiry if the user is a temp (beginning with -temp-). For the Action for the new set, choose Update User | Account Expiry and set a date three months past the processing date
And simply add a Condition for the matching of the user logon name pattern again, this time to “-temp-”
So now your entire Business Rule for new user account creation would look like this
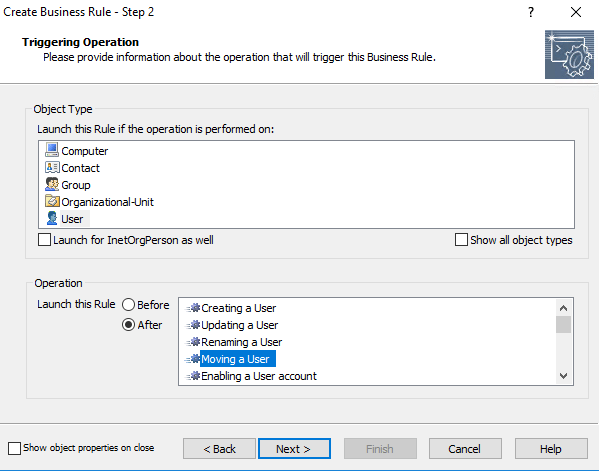
Our last requirements are around if a user is in a particular OU, add them to a security group which will facilitate software deployment of a specific application set. For this, we will need to add a couple of Business Rules for when a user account is moved. To scope the move into a specific OU and not any move, we simply apply the Business Rule only to the OU we are concerned with. So for the “Power Users” OU we create a new Business Rule and name it
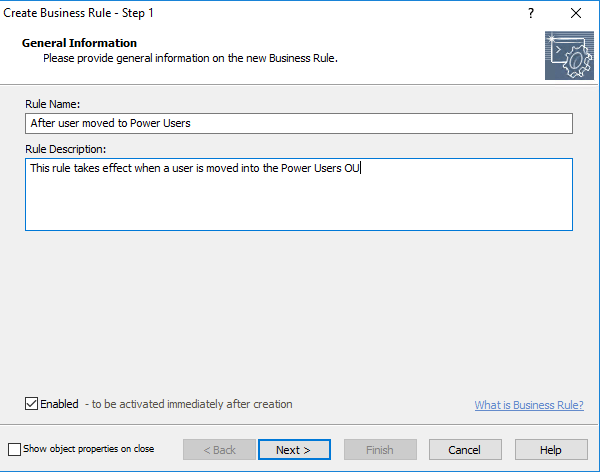
And then apply it to trigger after a user is moved
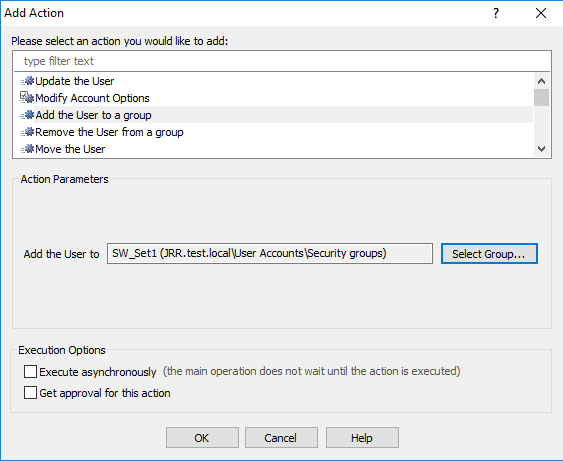
Add the required Action for the trigger (in this case, adding the user to a security group called SW_Set1)
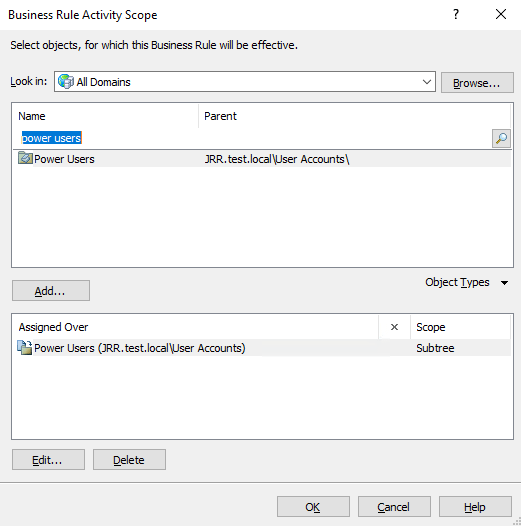
And then scope it so it only applies to the target OU (i.e. when a user is moved into it)
Then just repeat the steps, substituting the Power Users OU for Standard Users, and the target group from SW_Set1 to SW_Set2. This should leave you with these two new rules

It’s as simple as that – it’s a very intuitive GUI, and it is easy to build expressions together into your Rules to do quite granular things.
Deployment
These rules should take effect immediately, assuming they’re all Enabled in the console.
So, when an admin creates a new user through the Active Directory section of the Adaxes console, we will get a dialog box informing us that there are rules to be processed (you can turn this off when you wish).
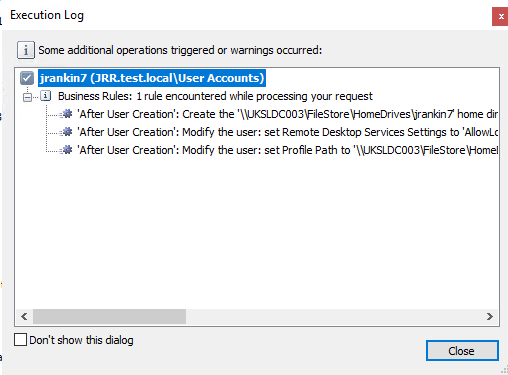
The rules for “admin” and “temp” users have not been processed, because the user object does not meet the criteria. However if we then check the properties of the user object we can see that the requirements we stipulated have been applied.
And if we then move the user into the “Standard Users” OU, we will see the group memberships being updated as required
If we create a user with the prefix -admin-, we can see it is automatically added to Domain Admins
And a user with prefix -temp- automatically is set to expire three months from the current date
Boom! So now our service desk users don’t have to do anything manual, bar creating users and moving them to the required OU. If they are to be admins, just prefix their username with -admin-, if they’re temps, prefix their username with -temp-. Apart from these simple steps, everything is driven by our automation rules. Now just imagine (in a complicated enterprise environment) how much time you can save, how much you can simplify your provisioning processes, and how many errors and misconfigurations can be avoided. And it is dead easy to get to grips with – I spent about an hour and a half installing it, setting up these rules, testing them and blogging it, and this is what I’ve managed to set up 🙂
I’m barely scratching the surface of the capabilities of Adaxes with this, there’s loads more we can do, so we will be revisiting it quite a bit as I do this series on automating bits and pieces of your environment. But hopefully this might whet your appetite a bit. If you want to know more about it or fire me some questions, find me on Twitter @james____rankin, drop a comment below, or fire an email to james [at] htguk [dot] com

