
Let’s get back to some AppSense content for a change. You may have noticed I’ve been trying to broaden the scope of this blog (despite the name!) and concentrate a bit more broadly on the EUC sector. However, it’s time we paid some attention back to the core subject for our first post of 2016.
AppSense, as you’re probably aware, has a few different triggers. Triggers are points during the operation of an endpoint device that are used for initiating sets of context-based Actions. In the latest DesktopNow versions, we have these triggers:-
- Computer Startup – initiated when the computer boots up
- Computer Network Available – initiated when the computer connects to a network prior to the user logging on
- Computer Process Started – initiated when a system process starts
- Computer Process Stopped – initiated when a system process stops
- User Pre-Session – after the user logs on, but before Terminal Services starts. This is useful for setting environment and session variables, and certain Group Policy Objects. Particularly useful is setting the Personalization Server here, as Personalization actually starts during the logon (for Windows Settings Groups), and this is a convenient way of making sure the preferred server is set prior to it commencing synchronization.
- User Pre-Desktop – this is what we’d traditionally consider the “logon” point, the actual delay between entering credentials and seeing the shell as the user environment is created
- User Desktop Created – this occurs once the shell has started, and is useful for running long or complex routines that could otherwise delay the actual logon process
- User Process Started – initiated when a user process starts
- User Process Stopped – initiated when a user process stops
- User Session Locked – initiated when the session is locked by the user
- User Session Unlocked – initiated when the session is unlocked by the user
- User Network Connected – initiated when the user connects to a new network
- User Network Disconnected – initiated when the user disconnects from all networks
- User Session Disconnected – initiated when the user disconnects from an RDP session
- User Session Reconnected – initiated when the user reconnects to an RDP session
- User Logoff – initiated when the user logs off from a session
In previous articles, we’ve discussed adding a single custom trigger which I christened the “offload trigger”. Basically, it involved creating an executable that did nothing except run for a pre-determined length of time (usually 5-10 seconds) and then exited. By running this at logon, and using a Process Stopped node, we were able to run sets of Actions “offloaded” by a certain amount of time after logon had finished.
This custom trigger was quite popular until EM8 FR5 came along and introduced the “Desktop Created” trigger which did away with the need for this. At least, until Windows 8.1 and 10 hit the streets. These Windows versions have a nasty habit of setting up certain user settings (such as the Start Screen, and privacy settings) after the Desktop Created trigger has already run, and therefore reintroducing the need for the Offload Trigger. In my Windows 10 deployments, I find myself using the Offload Trigger quite extensively, normally with about a 6 second delay configured.
The setup of an Offload Trigger is detailed in this article and is all still perfectly valid. So now we have the following custom Trigger added to the list above:-
- User Offload Trigger – initiated a pre-determined amount of time after user logon has completed
However, as I’m sure some of you are quite aware and have probably implemented yourselves, we can extend the functionality of this blank executable a little further and create a couple more custom triggers. We’re going to create a “User-Initiated Trigger” and an “Auto-Refresh Trigger”.
User-initiated Trigger
This is the simple one and something I’ve seen people deploying in a number of situations. Basically, we just use the blank executable from a shortcut to allow users to trigger certain groups of Actions. In fact, we already discussed this in a previous article without really referring to much of the potential reuse of the concept. Common uses are re-running printer or drive mapping routines in case either of them don’t complete correctly. I’ve also seen them being used for things like aborting shutdowns and stopping Personalization. The beauty of using AppSense for this is that it is trivial to set up elevation, so you can allow a user to run a routine with admin access should it be required.
Create a blank executable as discussed in the setup article, but set the timer quite low (you could do 1 millisecond, but normally I go for 500). Copy this down to your endpoints using whatever method you find convenient.
Next, use AppSense Environment Manager to set up some shortcuts for the user (either on desktop or Start Menu or other location – the choice is yours). For this example, we will set up two different shortcuts for the user – one to remap drives, and one to restart the print spooler. I know you could allow access to the Print Spooler restart through Application Manager System Controls but a) not everyone has Application Manager, and b) using a shortcut is easier for the user than accessing the Services applet or command prompt.
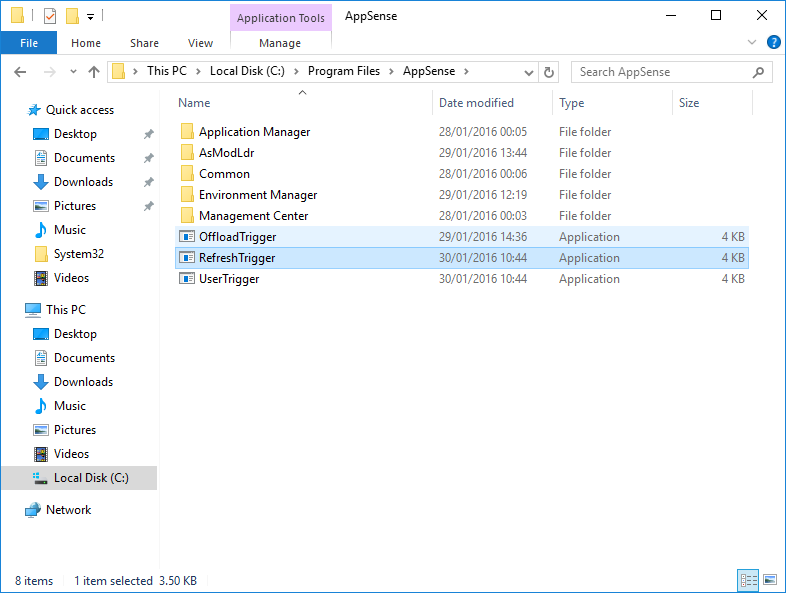
Each shortcut will point to our custom executable (called UserTrigger.exe) but will have a different parameter configured.
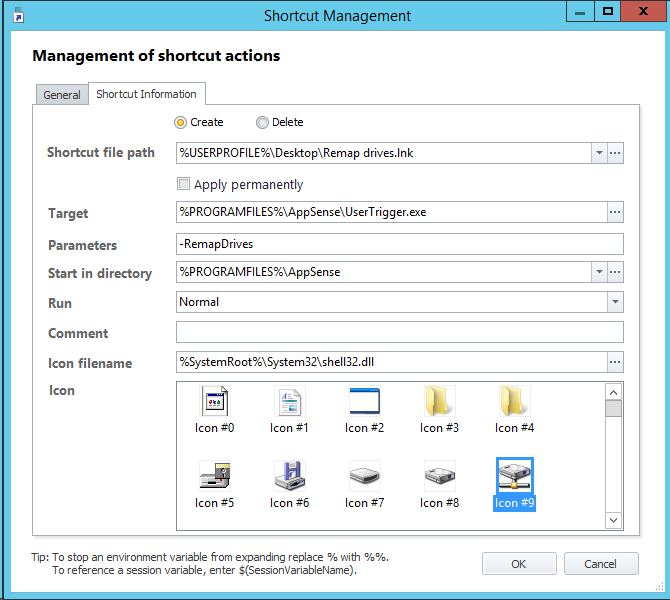 |
| Shortcut for the drive mappings routine |
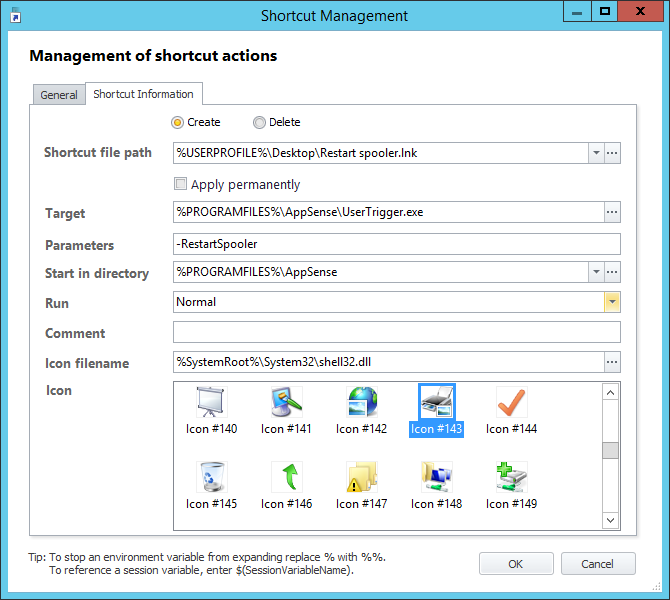 |
| Shortcut for the spooler restart routine |
The only difference between each shortcut is that the parameters passed are different (and the icon, obviously).
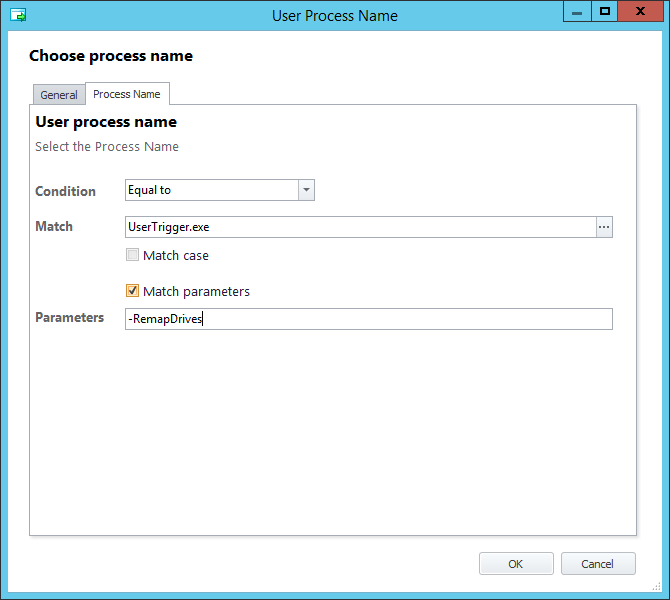
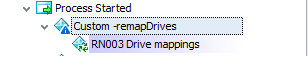
What you can now configure is either a Process Started or Process Stopped Action to match these shortcuts. It doesn’t matter which – the only difference is the Process Stopped Action will only start after the executable exits (which means there will be a negligible delay). Remember to configure them to match the parameters you set up in the shortcuts
 |
| Process Started/Stopped node for remapping drives routine |
 |
| Process Started/Stopped node for restart spooler routine |
Once this is done, you now have two Triggers which will be initiated when the user double-clicks the relevant shortcut you’ve set up. Simple! Now you can hang the required Actions off the Process Started/Stopped nodes as necessary.
For remapping drives, we’ve simply linked our Reusable Node for drive mappings. So if a user is missing any drives, before calling the support desk, he can attempt a remap of his configured drives just by launching the shortcut.
For restarting the Spooler, we will link up a couple of Execute Actions to the Process Started/Stopped node as shown below
 |
| Stop the Spooler… |
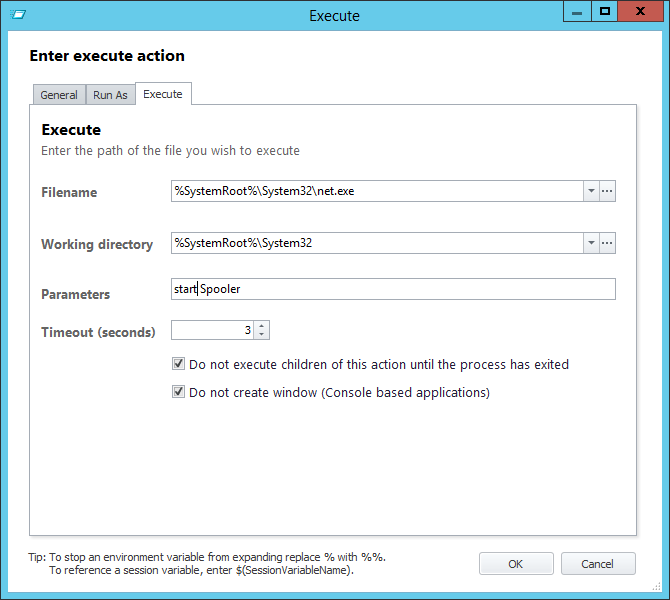 |
| …and start it again |
Just don’t forget that each of these Actions will need to be elevated to run as SYSTEM
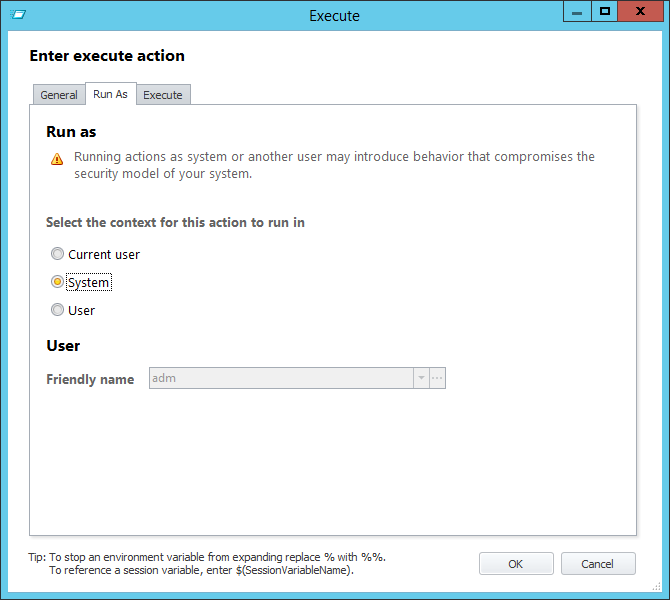 |
| Give the user the rights to actually restart the service |
So now we have a nice easy way to allow the user to trigger sets of Actions that may be useful to them for troubleshooting or administrative purposes, with a handy tick-box method of elevation attached. To summarize, we can use this to add the following trigger:-
- User-Initiated Trigger – allows a trigger to run based around the user executing a managed shortcut from somewhere on the endpoint
Auto-refresh trigger
Next, we will use one of these custom executables to initiate a Trigger based around a specific in-session refresh interval. Ideally, we want to do this without putting any extra overhead on the machine (so running processes or scripts for inordinate amounts of time is not an answer!)
Of course, many will say “well that’s just effectively replicating Group Policy”. Indeed it is, but in a lot of deployments the idea is often to use Group Policy for machine management and AppSense EM for the user side. Having to backtrack on this model for specific use cases is often rather annoying, so I’ve tried to come up with a reliable way to replicate it in EM. There’s always the chance that you may be looking to use features of AppSense EM that Group Policy Preferences doesn’t offer (and version 10 of EM will increase this), or to trigger a complicated script that isn’t supported by the options available via Group Policy refresh cycles, so there are definitely some use cases where this custom trigger is applicable.
Group Policy refresh interval also has an offset, so it would be nice if we could run our refresh trigger based around a specific time with a random offset.
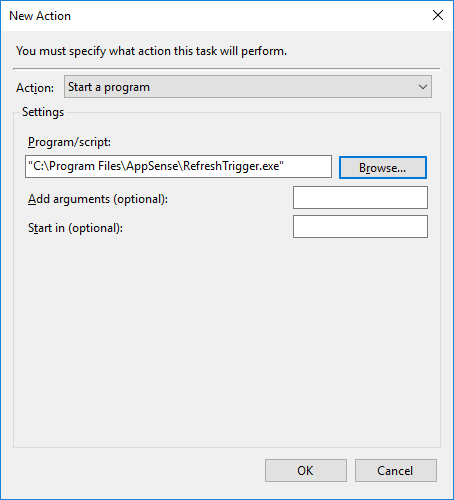
We will use the same executable (with the 500ms delay before exit) and simply rename it to RefreshTrigger.exe
If you want to use a pre-created XML file and save yourself the process of creating and exporting the Scheduled Task, use this one I created. However bear in mind this was created on Windows 10 and may not be suitable for use on other operating systems, so please check.
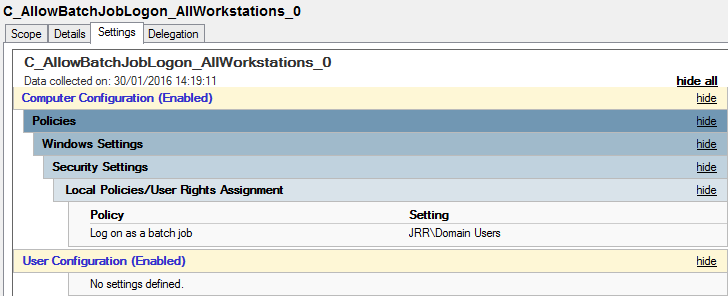
Also, users need the Log On As A Batch Job user right to be able to create Scheduled Tasks, so define this in Group Policy as required.
If you need to create the task yourself, first open the Task Scheduler interface (taskschd.msc) and navigate to Task Scheduler Library, before right-clicking and choosing New Task. Create the Task with the following properties (assuming you replace all the instances of jrankin with the creating username, and your OS as necessary)
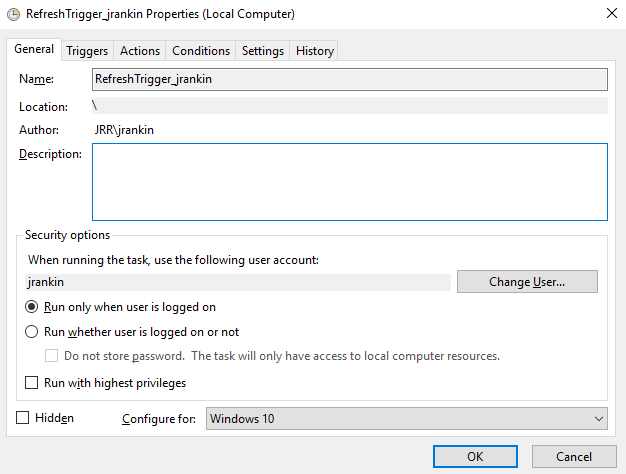
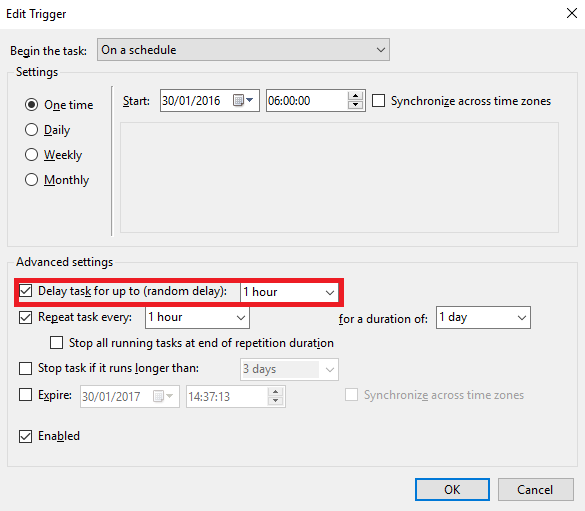
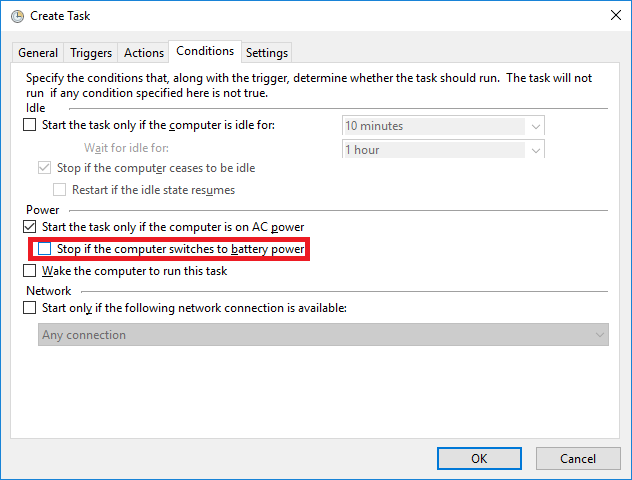
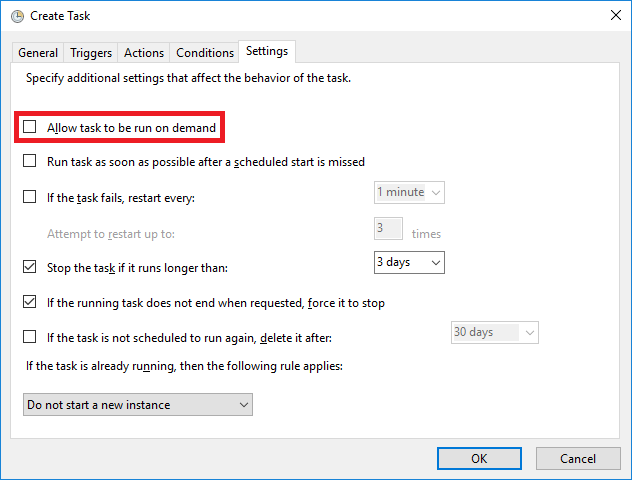
We need to create it on a Schedule, rather than At Log On. This is so we can take advantage of the Random Delay setting which will provide our offset. This setting is not available when set up At Log On. This will mean that the task will run when there is no user logged in – however, as we are going to set it to run in the context of the logged-on user, it should have no effect at all. The timing of the repeat and the delay are entirely up to you – we’ve simply used one hour for both.
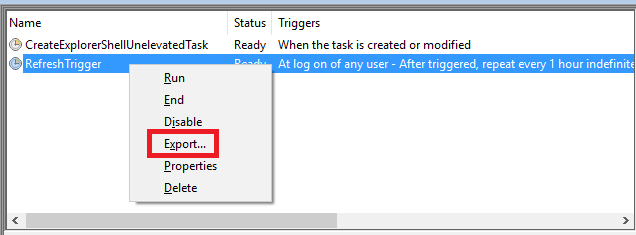
Finally, export the Task you have created which will generate an XML file.
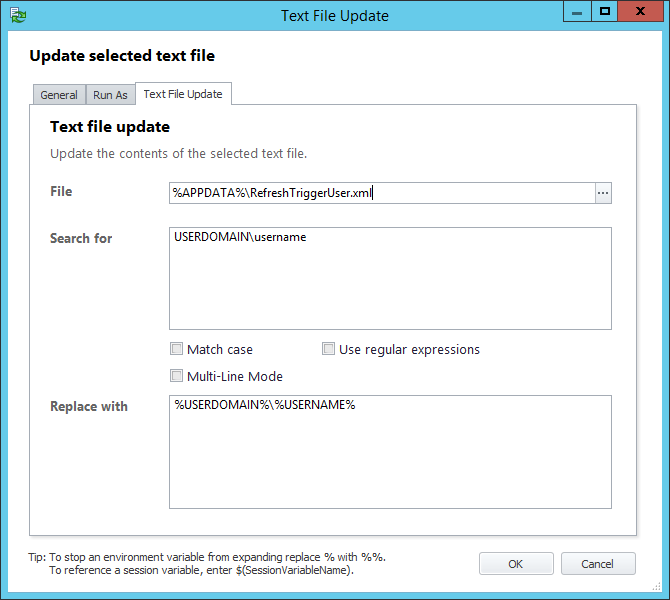
When a user sets up a task, it is saved to %WINDIR%\system32\Tasks with access to the file granted to only the creating user. Changing the user details in the XML file will allow us to get around this. If you look at the XML file, you will see the DOMAIN\USERNAME and the user’s SID referenced. Either use the file that I created, or open up the XML file you’ve exported and replace the user domain and username with USERDOMAIN\USERNAME, and replace the user’s SID with USERSID. Also, replace the title with a generic one – this will be overwritten by the command we use in any case.
Now it’s time to utilize AppSense to configure this XML file dynamically. Create a node in Pre-Desktop and call it something like Create user scheduled task
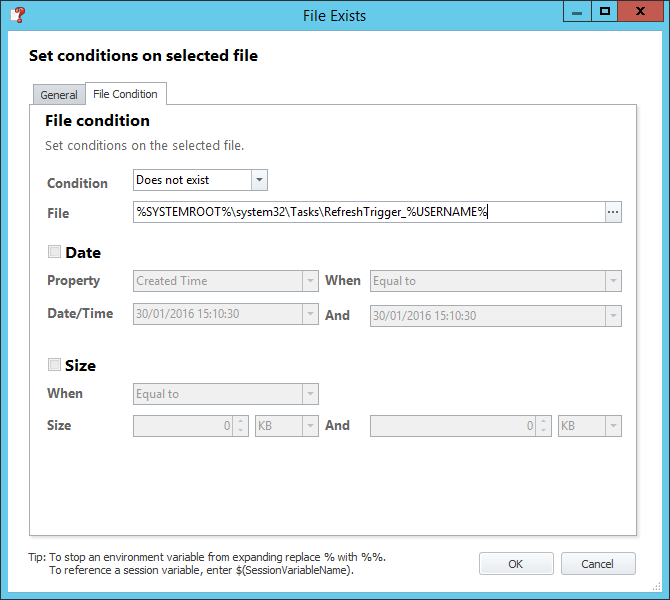
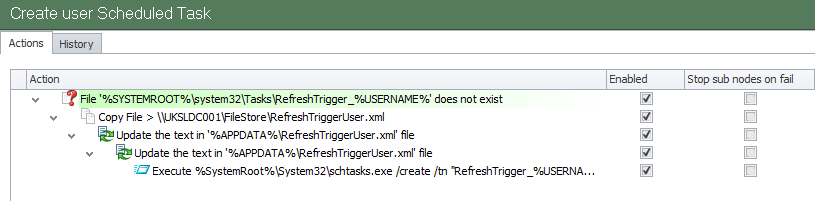
Firstly, let’s put in a Condition to check to see if the Scheduled Task already exists or not – no sense in redoing it at every logon if the user has a persistent profile.
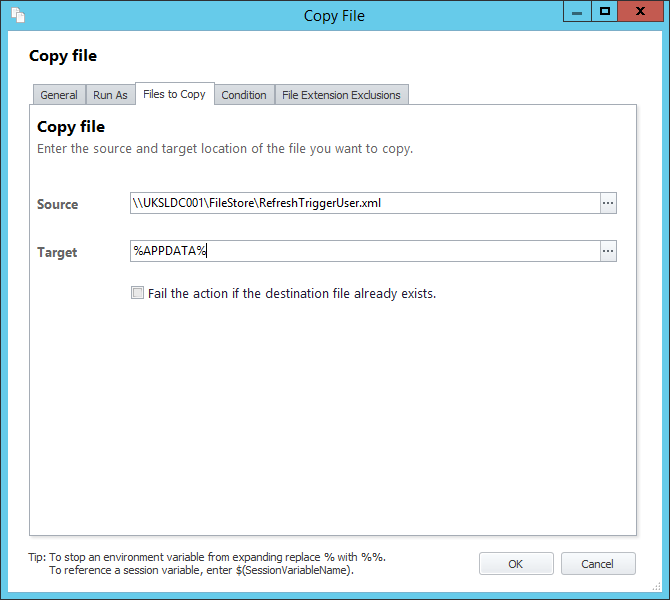
If the file doesn’t exist, we need to create it. So firstly, copy the edited XML file to a central share and set up an AppSense File Copy Action to bring it down onto the endpoint at logon.
Next, use the AppSense Text File Update Action to replace the USERDOMAIN\USERNAME string with the user’s correct details.
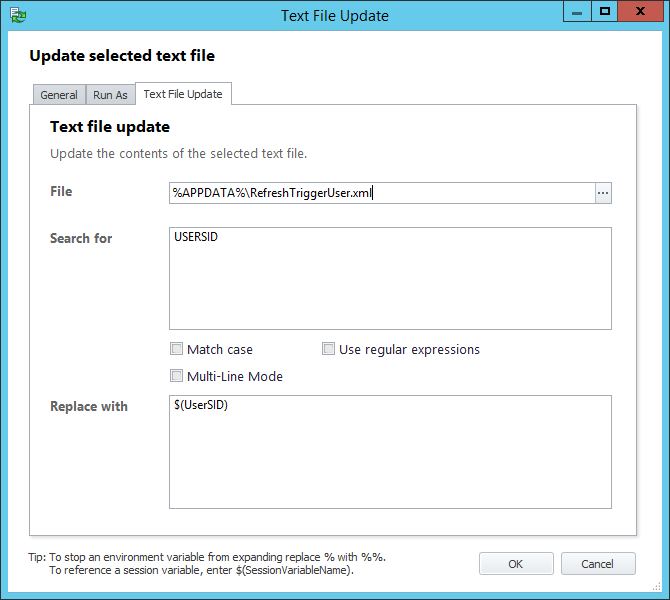
And then use the same Action to replace USERSID with the user’s SID. If you’re on 8.5 or up this is easy – earlier than that and you will be resorting to a bit of scripting.
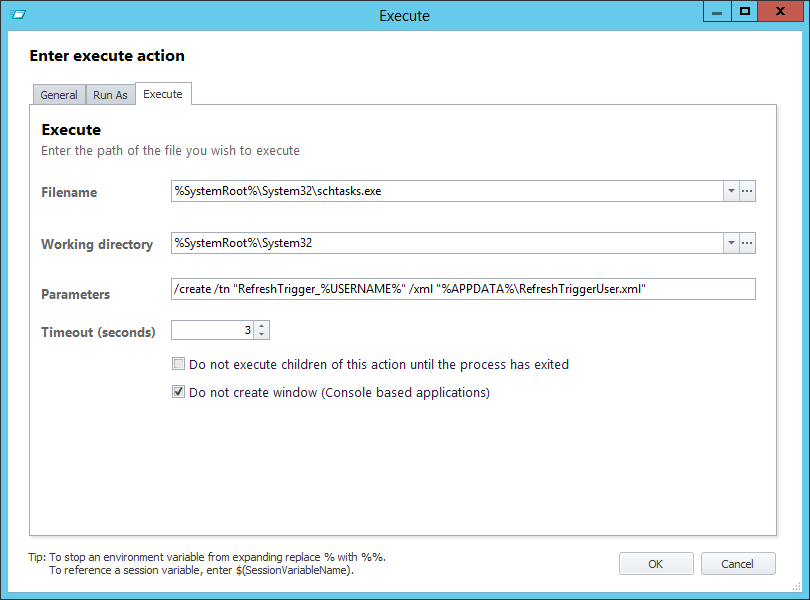
Finally, we need to execute the command that will create a Scheduled Task from the XML file we have just manipulated.
Just to be clear, the whole node that runs this Scheduled Task creation routine should look like this
There it is – we’ve effectively recreated an “auto-refresh” interval by creating a Scheduled Task and offsetting it. It will run every hour, offset by up to an hour, to avoid loading from whatever Actions you choose to put next to it.
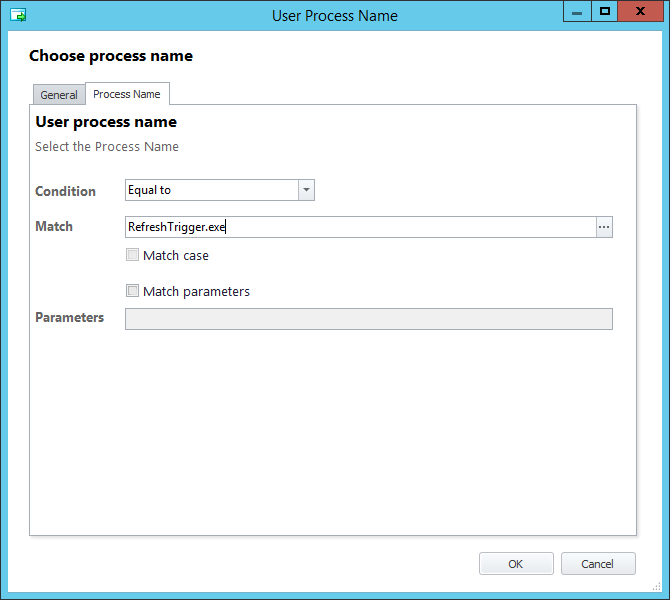
All you need to do is create a Process Started/Stopped node for RefreshTrigger.exe
And put any Actions in it you require! I’ve seen clients using this to replace desktop shortcuts – as using Self-Heal makes EM a lot more chatty, effectively checking a host of files and Registry keys every three seconds. Personally, I find using a refresh trigger a lot more efficient – and there are many other routines you could put in here, it’s up to you.
Just for posterity, we’ve now added a final custom trigger that is:-
- User Auto-Refresh Trigger – initiated by a Scheduled Task that runs during the user session with a pre-configured delay and random offset
So that’s how we can use those “blank” executables to extend the reach of our Triggers in Environment Manager and create some (hopefully useful!) customized ones. As in all cases, test thoroughly before you deploy, and if you have any questions or alterations please feel free to reach out via comments, email or Twitter.

