
That’s a big fat mouthful of a title right there. But hopefully it tells you what we are trying to do here!
The “WinX” or “Win+X” menu arrived in Windows 8.1, and has since become almost a sort of “Power User” menu with shortcuts to various useful functions for the more administratively-inclined amongst us. Personally, I always favoured either “Run” or “Control Panel” as the most useful links in this menu.
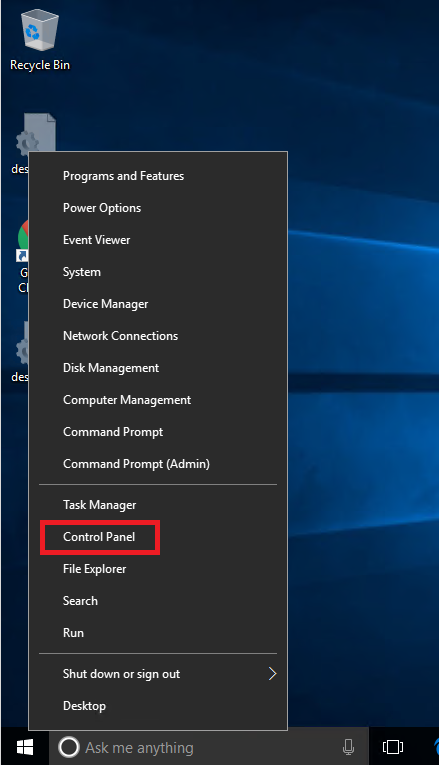
Windows 10 1607, proudly showing the “Control Panel” link
All well and good. But Windows 10 Creators Update (1703 build) removed the “Control Panel” entry and replaced it with “Settings”, taking us into the Settings Universal Windows App instead.
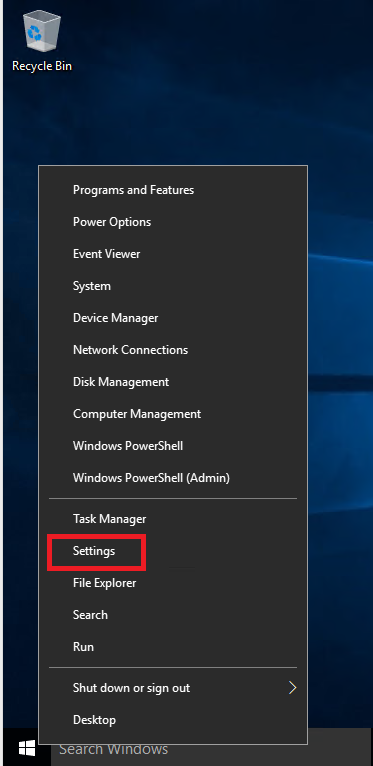
Windows 10 1703, and Settings has now appeared instead
Now, I’m well aware, like what they’re trying to do with GPO and InTune MDM, that Microsoft are quite keen that we move away from the old-school Control Panel and instead adopt the Settings app instead. More and more functions are slowly migrating into the Settings app. However, once you dig deeper into the advanced settings, you tend to get redirected to the old Control Panel applets anyway, and some applets are going to probably take a long time to migrate into Settings anyway (particularly third-party stuff like Flash and Java). And the Control Panel is nice and familiar – having been around since Windows 3.x, in my memory. What’s more, I don’t see why we shouldn’t be able to have a bit of a choice – classic Control Panel for the old-school users, funky new Settings for the millennials and Microsofties. Windows used to be about personalization and choice, didn’t it? Let’s not start that debate…
Of course, you could just right-click for the WinX menu, hit Run, type control, press <Enter>, and you’re still there anyway, yeah? But anyone who knows me probably knows that I hate stuff being arbitrarily removed that I find useful, and I’m stubborn enough to keep chasing after it even if it seems impossible. Besides, those eight extra keystrokes are a big productivity loss…
Digging under the hood
So first, we need to understand how the WinX menu is created.
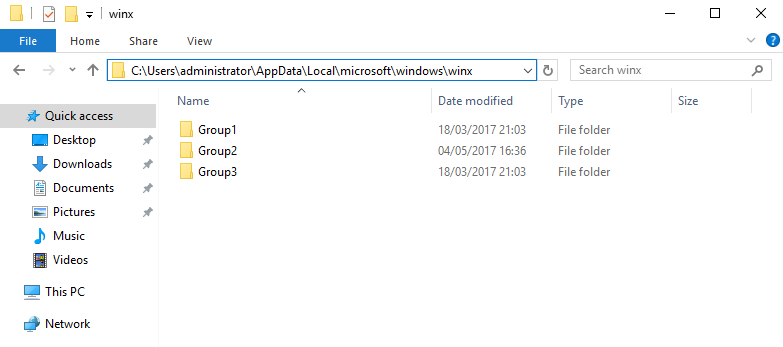
The entries that control the WinX menu are found at %LOCALAPPDATA%\Microsoft\Windows\WinX, and are subdivided into folders with names of GroupX (see below)
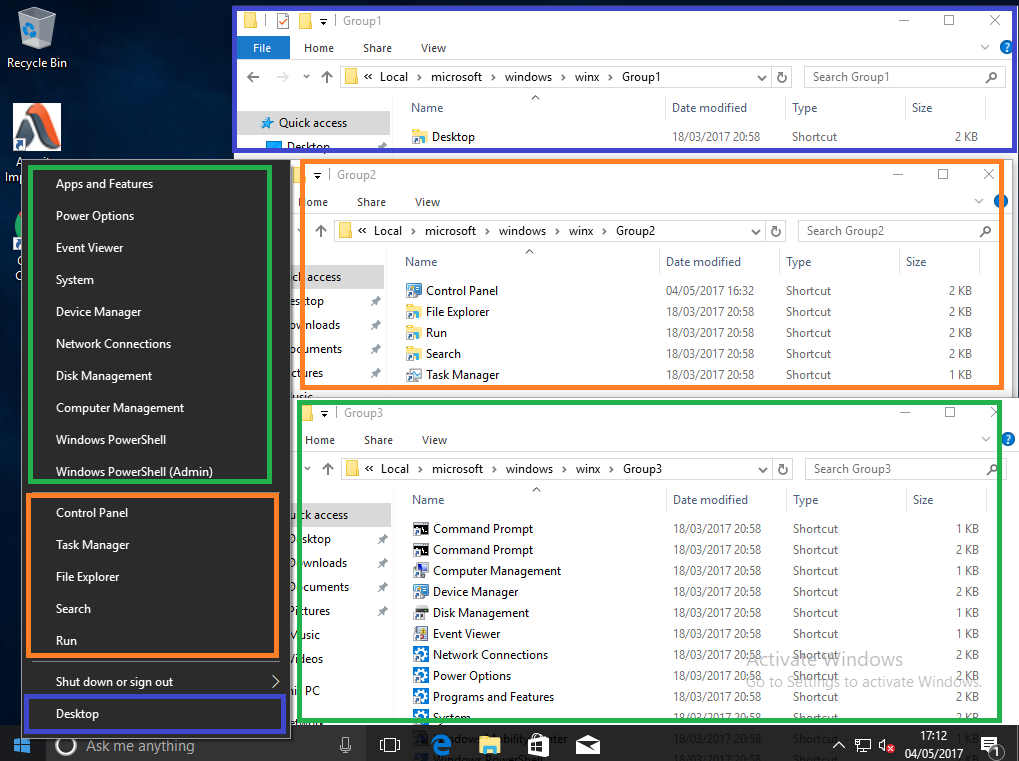
Now, the Group folders refer to different areas of the right-click menu, as shown by the colour-coded outlines in the diagram below
So you’re probably thinking, as I did, that you can simply utilize this filesystem and just customize the folders according to what you want on the WinX menu by removing and adding shortcuts to programs, yeah?
Wrong.
To be fair, Microsoft don’t really want to make it that easy – imagine if every application you installed plonked itself into the WinX menu. It could get nasty.
But you can’t even edit the existing shortcuts. I tried to subvert this by changing the properties of one of the pre-populated shortcuts and pointing it somewhere else. Now initially it worked – but as soon as the user logged off or Explorer was restarted, the changed shortcut disappeared. WTF?
Cracking the issue
There appears to be some hashing going on. A guy called Rafael Rivera from WithinWindows did an excellent write-up on how it is done. Here’s a reproduction of what Rafael found.
An approved shortcut…is a .lnk file that has the appropriate markings to indicate to Windows “Hey, I’m special.” The marking is a simple 4-byte hash of several pieces of information. From the .lnk itself, two points are collected:
The link’s target application path/file (e.g. C:\Games\Minecraft.exe)
The link’s target application arguments (e.g. –windowed)
The third ingredient is simply a hard-coded chunk of text, or a salt if you will, to keep things interesting. That string is, literally, “Do not prehash links. This should only be done by the user.”
With these three strings in hand, Windows then glues them together, lowercases everything, and runs them through the HashData function. But you’re probably wondering at this point, what does it compare to?
Let’s shift our focus to .lnk files. We know them as shortcuts to things. But they’re officially called Shell Links and can store a lot of information on other data objects in Windows. More specifically, they support storing a structure of data called a PropertyStoreDataBlock that acts as a container for arbitrary string or numeric key/value pairs. Yep, the “WinX hash” is stored in here. If you’re curious, the key can be defined as such:
DEFINE_PROPERTYKEY(PKEY_WINX_HASH, 0xFB8D2D7B, 0x90D1, 0x4E34, 0xBF, 0×60, 0x6E, 0xAC, 0×09, 0×92, 0x2B, 0xBF, 0×02);
So to tie it all together, Windows – the Shell specifically – iterates through the .lnk files in each GroupN folder; opens them up; pulls out and concatenates the target path, args, and an arbitrary string; then finally hashes the result. This hash is then compared with the one stored in the .lnk to determine if it’s approved. Rinse and repeat.
If you find that a bit TL:DR, Windows basically hashes the shortcut file and stores the hash inside the shortcut file itself as metadata. So if we want shortcuts within those WinX folders to appear on the WinX menu, they have to match the hash stored in the shortcut file. If we edit an existing shortcut or create a new one, the hash doesn’t match and the shortcut disappears next time the user logs in or the shell restarts.
So how do we get the files correctly hashed so we can load them into our WinX folders and have them appear?
Mr Rafael Rivera deserves a whole load of credit – he created a command-line tool called hashlnk which allows us to “patch” our shortcuts. Unfortunately it is a little difficult to find on the Internet, so I’ve stored a copy of it here for those of you who may want to download it.
Firstly, create your shortcut. We want a shortcut to Control Panel, so that’s fairly easy to do
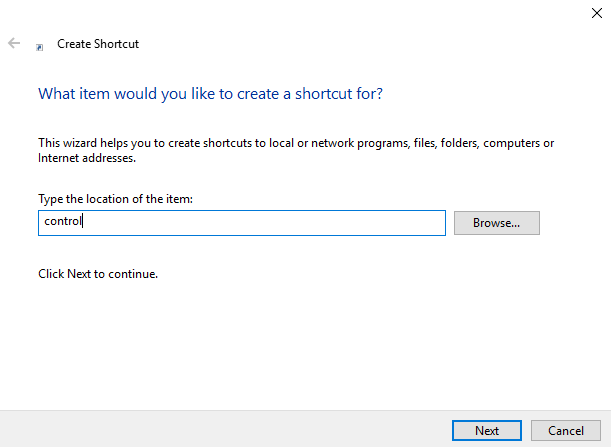
Next, run the hashlnk executable from a command prompt and supply the full path to your shortcut file as the parameter
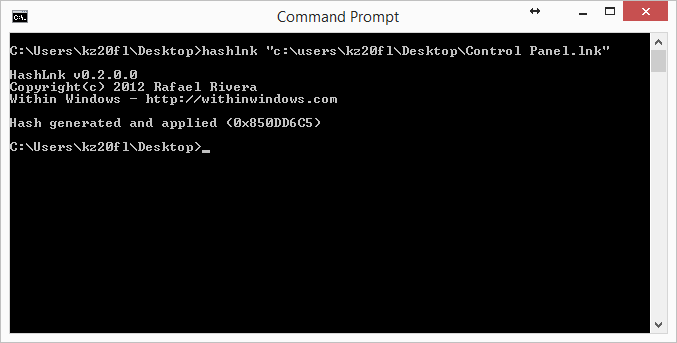
Now interestingly, you can’t use the hashlnk executable from Windows 10 itself – it crashes with a dll error. However, as long as you have an older version of Windows that you can create the hashed shortcut from (Windows 8.1 and Server 2012 R2 work absolutely fine), you won’t have any issues.
So now we simply need to take the “patched” shortcut file and pop this somewhere it can be used to populate the user’s WinX menu. The obvious way to do it (because the files are read and used when the shell starts, so it has to be done usually before logon, although more on this later) is to edit the folders in c:\Users\Default\AppData\Local\Microsoft\Windows\WinX, because these will be used to create each user’s profile as they log in for the first time.
We’ve opted, in this case, to remove the Settings shortcut from the Group2 folder, and replace it with our new “patched” Control Panel shortcut. An interesting thing to note is that sometimes the name that appears on the WinX menu may be different from the actual shortcut name – if this happens, edit the shortcut and put the name you want into the Comment field.
So now, when any new user logs on to our Windows 10 1703 build, they will get “Control Panel” instead of “Settings”. Here’s an image to show exactly that.

Awesome-ness – we now have Control Panel back where it was before! Sweet!
Taking it further
What you can do is leverage something like Group Policy Preferences to set the Default User folders up precisely the way you want them. But because we are using the default user folder to populate this, we’re essentially making this device-specific. Is it possible that we could find a way to create different WinX folder layouts based around different sets of users? Could we even add additional folders?
To demonstrate this we are going to try and add a fourth folder section with a couple of shortcuts within it. For the first user, we will try and put Google Chrome in there. For the second user, we will put Internet Explorer. Simple enough for a quick test 🙂
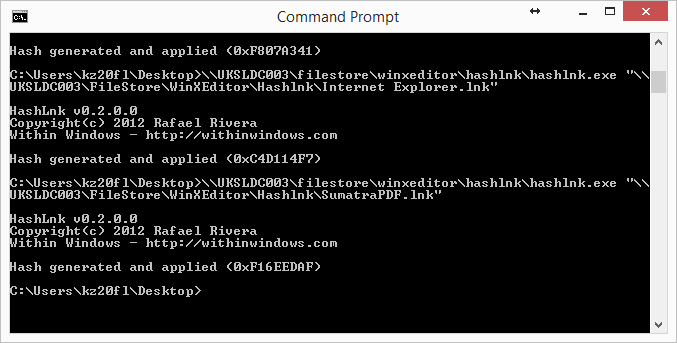
Firstly, you need to hash each shortcut using the hashlnk tool and put the “patched” files into a folder that is accessible from the network. Don’t forget you can’t run hashlnk from Windows 10!
Next we need to find a way of copying these shortcuts into the user profile before the shell actually starts, and making the file copy conditional. To do this we could try Group Policy Preferences or Ivanti DesktopNow – many other methods may work, but I tested these two because they were easiest for myself 🙂
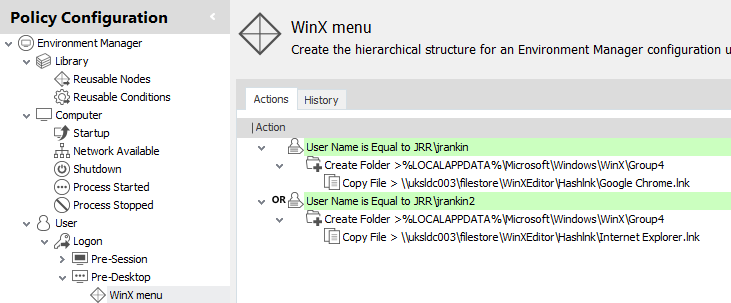
In Ivanti DesktopNow, we use a Pre-Desktop node which should execute before the shell starts. We simply create the Group4 folder and then copy “patched” shortcuts into it from a network share dependent on a Username Condition.
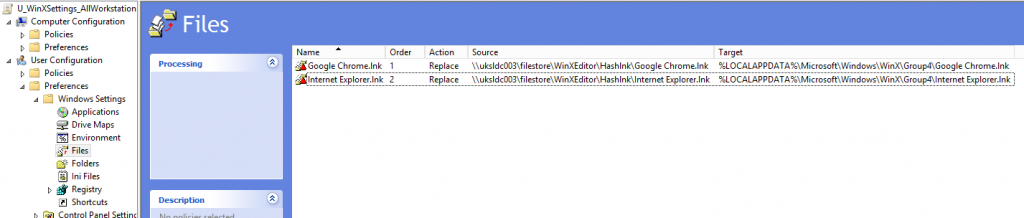
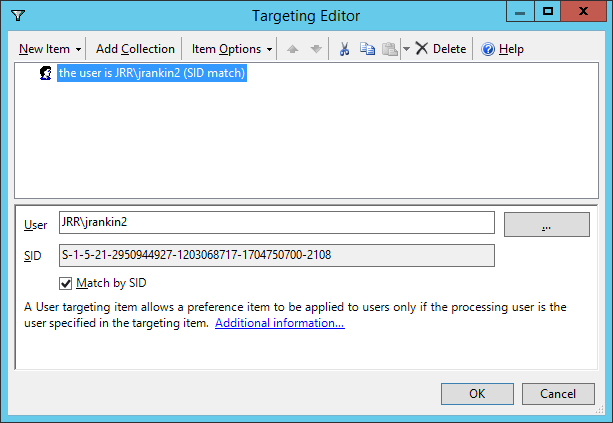
In Group Policy Preferences, use a File item in User | Preferences | Windows Settings to copy each of the “patched” shortcuts into the required area, with Item-Level Targeting set up for the specific usernames.
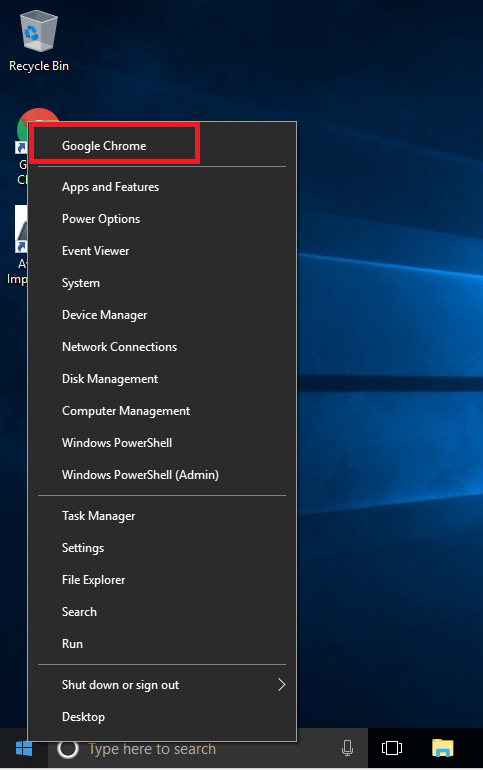
Both of these methods work equally well. For our first user, the one who gets Google Chrome, their WinX menu now looks like this
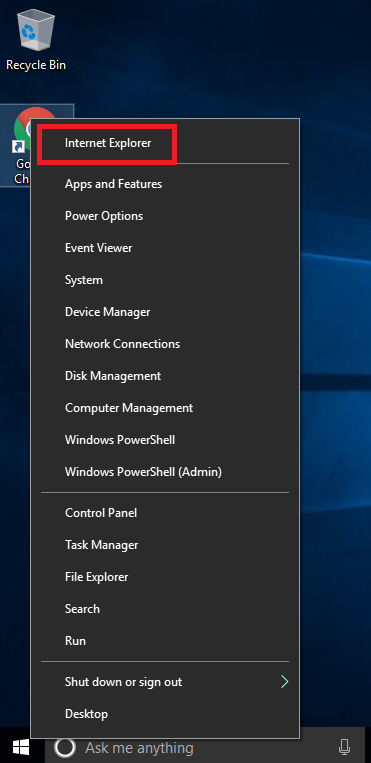
And for the second user who was allocated Internet Explorer as the additional shortcut, their WinX menu now looks like this
That’s awesome – we can use GPP or a third-party tool to give ourselves custom WinX menus for different sets of users on the same devices. Uber-cool!
Summary
The WinX menu is intended by Microsoft to be unchangeable, but sometimes we might want to do this for reasons of productivity or just to tailor our user environments to keep the users happy. Big credit to Rafael Rivera for his hashlnk tool which lets us get around these restrictions and use Windows 10 in the way we’re used to using Windows – as an environment we can customize to the needs of our business.
Of course, the next feature update for Windows 10 will probably break this (or worse – change the hashing mechanism!), so as always, make sure you test thoroughly before deploying and check all your customizations when the next iteration of Windows comes along.
UPDATE – video tutorial for this available now https://youtu.be/BdzZlTiSFyI

