Hahaha. Maybe one should always check with others before writing something up, eh?
About two weeks of my life I spent trying to get persistence of the Windows 8.1 Start Screen working, and even at the end, it felt hit and miss. “User profile service failed the logon” and “you have been logged on with a temporary profile” were appearing all too often for my liking. Also, I had somehow, whilst applying the configuration I wrote about in my previous article, managed to stop the Windows 8.1 right-click mini-Start Menu from appearing (God knows how). So after a Twitter-whinge, I was put onto Tom Scase of AppSense Professional Services who had been having a struggle against this problem himself. And I really wish I’d had my Twitter-whinge sooner!
The solution
Tom (and Simon Bond from Ultima) had come across this issue and realized (as I was rapidly starting to believe) that persisting the appsFolder.itemdata-ms and appsFolder.itemdata-ms.bak files from {CSIDL_LOCAL_APPDATA}\Microsoft\Windows was, to put it fairly mildly, unreliable. To the extent that I’d almost started (sorry, Anwarul!) recommending that people don’t deploy Windows 8.x in the enterprise – although the lack of proper GPO support and behind-the-scenes changes probably don’t mean my perspective on that has altered too much, to be fair.
Anyways – unlike me, who had simply decided to batter his head against these two files until they decided to work (sort of), Tom and Simon decided to go for a much simpler, more elegant solution. Remember the Export-StartLayout PowerShell cmdlet? We used this in the previous article to create a copy of our settings in a .BIN file that could then be imported into the default profile using Import-StartLayout. But the key to what Tom and Simon put together was that if neither of the appsfolder.itemdata-ms* files were present in the user profile at logon, if you placed the appsFolderLayout.BIN file in there, it would expand the .BIN file and create the Start Screen – but most importantly (remember the VBScript in the previous post?) start a refresh.
So – and you are probably starting to realize what they went for now – if you use Export-StartLayout at the Logoff trigger to take a copy of the existing Start Screen settings to a .BIN file, and then saved that into Personalization Server, you could restore the customized settings and trigger the refresh by using Personalization Server alone.
This way works, and it works well. So we are going to cover this post off from the perspective of saving Start Screen settings using this method. But what we will also do is again address the problem we attacked in the previous post, that of setting a default bunch of Start Screen tiles.
We will cover it in two separate sections, obviously dependent on profile type, which we will subdivide neatly into two types from hereon in…
Profile type #1: Local profiles with flip-to-temp, or persistent local profiles (which might be used by laptop/mobile users)
Profile type #2: Mandatory/super-mandatory/roaming/UPM profiles
Create your default Start Screen
The Start Screen settings we are going to import are:
So, log on as a user, and set up your default settings the way you want them.
Export the default Start Screen to a file
Once you’ve got it set up the way you want it, now we need to export them out to a BIN file (for profile type 1) or an XML file (for profile type 2).
Profile type 1 – Export-StartLayout -As BIN -Path pathtoyourfile.bin

Profile type 2 – Export-StartLayout -As XML -Path pathtoyourfile.xml

Import the default settings at first user logon
Next we need to make sure that we have the default settings imported in for the user at first logon. Again, how you do this depends on profile type.
Profile type #1
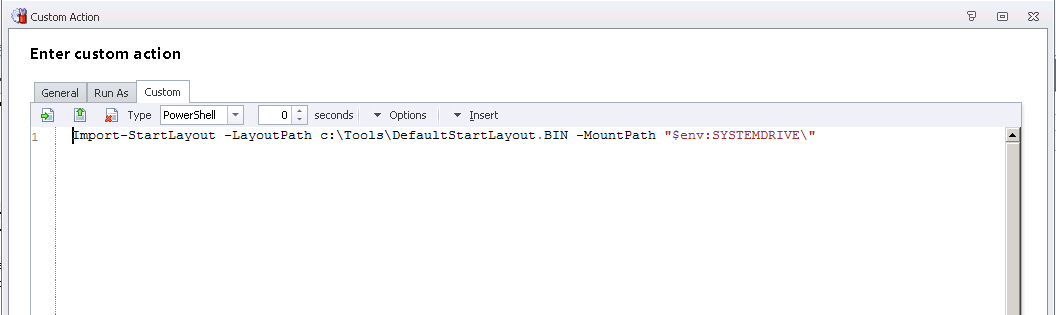
In this situation, we want to import the settings from the BIN file we exported into the default profile (which will then be used to create the user’s profile each time they log on), we need to use a PowerShell cmdlet at Computer | Startup or Computer | Network Available (dependent on where you stored the BIN file you created, and what version of EM you are running)
The command is this
Import-StartLayout -LayoutPath pathtoyourfile.BIN -MountPath “$env:SYSTEMDRIVE\”
Now, as mentioned earlier, be aware that this command operates on the default profile on the machine. Essentially, we are modifying the Start Screen for the default profile (c:\Users\Default) as the device starts up.
Note that what this cmdlet does, under the hood, is simply bung an appsFolderLayout.BIN file into %SYSTEMDRIVE%\Users\Default\AppData\Local\Microsoft\Windows, so if the path doesn’t exist, then the cmdlet will fail. (This one burned me when I tried to be too clever with the default profile!)
This process is shown being done in AppSense EM in the images below

This is all that’s required for this profile type – you can now jump ahead to the Enable For Personalization segment.
Profile type #2
If you’re using profile type #2, importing in a default set of Start Screen tiles is going to be slightly more challenging. Now I’m sure you’re thinking, why? Because by far the easiest way to achieve this for these profile types would be to pin a few items to the Start Screen in the default or mandatory profile, and then enable for Personalization Server as below. But sometimes you don’t have this option – maybe you are migrating existing profiles across, or the default/mandatory profiles have already been sealed and dropped into images or onto network shares, or maybe even you want to be able to edit the default items without recreating the base profile. So we will approach this from the perspective of deploying a default set of shortcuts to the Start Screen without involving editing default or mandatory profiles – but if it’s possible, I’d always try using the simpler method!
Another situation (which I encountered recently) is that when using SCCM or another build process to create the machine, sometimes all the apps aren’t installed at a particular time – they are layered into the build via the task sequence. Creating the default profile in this case with the shortcuts pinned to the Start Screen simply created an unholy mess, because apps were imported that weren’t actually installed yet. In this case also, using a separate method to import the default settings is very necessary.
In order to import the files into a “pre-existing” profile, we can’t use the Import-StartLayout command – as we’ve said previously, that would simply set to work on the default profile, which obviously isn’t used in this case. We can, however, use the Start Screen Layout GPO, which uses the XML file we exported earlier.
The problem is, this GPO locks the Start Screen into read-only mode – meaning we can’t edit the Start Screen once we’ve logged in. Bit of a problem!
To get around the problem with the locked Start Screen, we are going to set the GPO to Enabled early in the logon process (setting up the default Start Screen), and then set it to Disabled later on in the process (allowing the user to change it). Nifty! We will combine this with a Registry flag, so that the GPO is only ever exported the first time the user logs in.
The time at which the default Start Screen gets set via this method seems a bit hit-and-miss – sometimes it seems to work OK at Logon | Pre-Desktop, other times it necessitates moving to Logon | Desktop Created. Whichever one we end up using, we will set the GPO through an EM ADMX Action, and specify the XML file that we created with Export-StartLayout. Note – you will need the Windows 8/Server 2012 GPO files, obviously, so a 2012 R2 DC may come in handy, or some file copying 🙂
However….to successfully unset the GPO and unlock the Start Screen for customization has to be done at a very particular time. This in turn brings with it a requirement that I didn’t think I would need again after EM 8 FR 5 shipped – that of the Post-Logon Offload Trigger (that’s what I christened it – others may have different terms for it). Once you’ve locked the default imported Start Screen, you need to unlock it by reversing the GPO a certain amount of time after the desktop has initialized. Now, the Desktop Created trigger which arrived in EM 8 FR 5 doesn’t run late enough to fulfil this requirement, so, annoyingly, it is back to the Post-Logon Offload Trigger (PLOT), the setup of which is described in detail in this post. Before you get started, set this up – you’re going to need it!
So, the setup of this part of the configuration (the user getting the default Start Screen at first logon) would look like this (remember this goes in the Logon trigger):

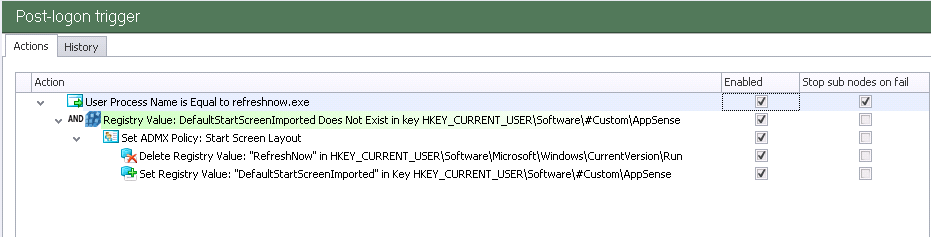
Obviously our Registry flag is set at the end of this, so the default set of icons won’t be imported at next logon (unless the users settings were removed, obviously).
This method (setting and then unsetting the GPO) works quite effectively, although if you’re lightning fast on the keyboard, you may notice a tiny delay during which you are unable to customize the Start Screen. Any normal user wouldn’t notice this – and it will only happen at first logon anyway.
Now, whichever profile type you are using, the method of Personalization is exactly the same (and far simpler than that in the previous post).
Firstly you will need to set up your Windows Settings Group and link it to your Windows Personalization Group. The folders/files you will need to add into this are:-
{CSIDL_LOCAL_APPDATA}\Microsoft\Windows\appsFolderLayout.bin
{CSIDL_PROGRAMS}
Update – according to my Google-fu, you may also need this folder saving as well (although this worked fine for my testing without it)
{CSIDL_LOCAL_APPDATA}\Microsoft\Windows\Caches
(The {CSIDL_PROGRAMS} is required to roam any folders that may be pinned to the Start Screen)
As for Registry keys, simply add these:-
HKEY_CURRENT_USER\Software\Microsoft\Windows\CurrentVersion\Explorer\StartPage
HKEY_CURRENT_USER\Software\Microsoft\Windows\CurrentVersion\ImmersiveShell\Grid
HKEY_CURRENT_USER\Software\Microsoft\Windows\CurrentVersion\Explorer\Accent
[also, don’t forget to add your custom Registry flag here as well, if you’re using a non-local profile]
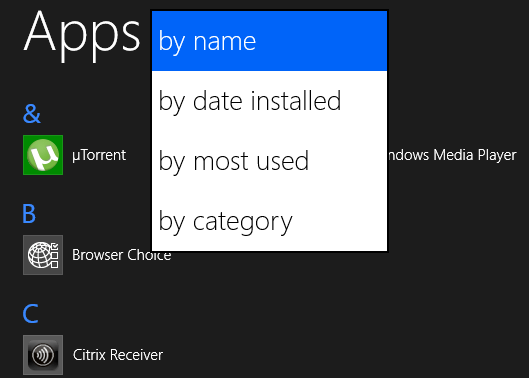
The first Registry entry above holds Start Screen custom backgrounds, the second one controls the app sorting preference (see image below), and the third one deals with Start Screen custom colours.

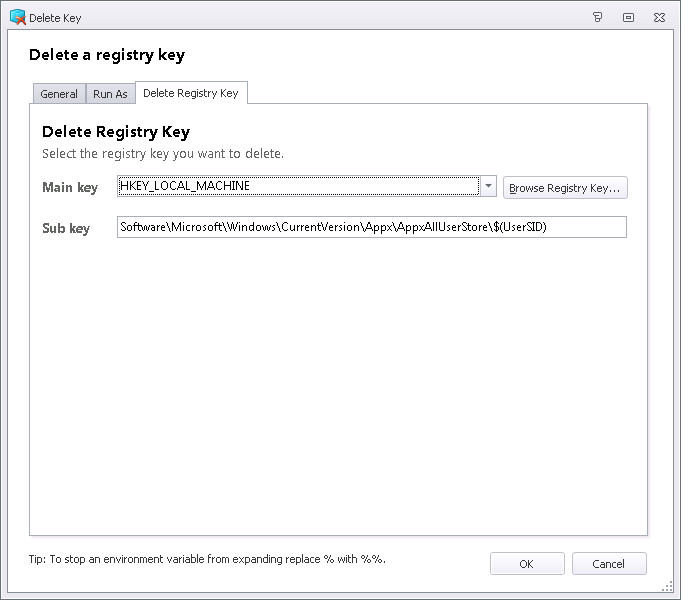
Finally, we need to put together the necessary Logoff Actions which are responsible for dumping out the Start Screen settings to a BIN file, and then doing a bit of tidy-up afterwards. Tom and Simon found that there were some extraneous settings getting written to HKLM which may cause issues with the Personalization, so we will handily leverage the UserSID variable from EM 8 FR 5 to clean these up nicely!
First of all, in the Logoff trigger, we will set a Custom Action running these two lines of PowerShell (the first one may wrap)
And underneath this, in a sub-node, we will put the tidy-up Action (removing a Registry key)
The two configurations we have created are available for download below, for each profile type. Don’t forget you also need to create the Windows Settings Groups in Personalization Server – the configurations won’t cut this on their own! Also, the paths to the export files will need to be set correctly for your environment.
Download configuration for local profile (with or without flip-to-temp)
Download configuration for non-local profile (mandatory, roaming, etc.)
I’ve also put a node in those configurations that disables the Windows 8.1 first logon animation, which sets the Registry value of EnableFirstLogonAnimation at HKLM\SOFTWARE\Microsoft\Windows\CurrentVersion\Policies\System, just as an extra bonus 🙂
Summary/credits
Well, that’s much slicker and better than the previous method I espoused. Especially if you don’t need to provide a default set of icons to a user with profile type #2 – if you can get away with putting the default icons into the base profile, then it makes this a much more straightforward (and shorter!) article.
Uber-massive kudos due to Tom Scase and Simon Bond for coming up with this method – simple, but genius. Combine this with the set-unset method for the Start Screen Layout GPO, and we’ve pretty much got all of our angles covered. I’ve been testing this for a few days now, and I’m seeing no more of the errors I was being subjected to previously. Obviously Richard Thompson and Richard Bancroft deserve credit to for their original efforts around this again, as they gave an invaluable insight into how much of an absolute abortion Microsoft’s processes are in this area (no surprises there). And also a mention to Aaron Parker for his blog piece discussing how to use the BIN file in the PowerShell cmdlets.
Hopefully this should work for those of you with the misfortune to have Windows 8.1 deployments in your AppSense environments. Any questions or comments, please leave them below, or catch me on email/Twitter.

