
I wrote a comprehensive post a few years ago (God, it’s been that long?) on how to create mandatory profiles. When Windows 10 came along, mandatory profiles had been completely and utterly forgotten about, and simply didn’t work. After a while, they got around to fixing this, and I ended up recording a (rather long!) video about how to create them.
Unfortunately this had some issues around UWP apps, in that they seemed not to work very well when using a mandatory profile. And then, just as I was getting around to having a look at the WP issue, Microsoft released the Creators’ Update (1703). This, although it ostensibly brought back the capability to use the Copy Profile command to create a mandatory profile, also had the annoying effect of now breaking the Start Menu when you used a mandatory profile (thanks to Pim for the heads up on this issue). So, yesterday I set about cracking the issues that we had, so we needed to create a mandatory profile and test:-
a) Whether the Start Menu functions
b) Whether the UWP apps function
c) If both of the above still work OK when the user logs in to a second machine
Now, the only officially supported way to create a mandatory profile is by using Audit Mode to create a custom default user profile, and then using the Copy Profile command to move the customized default user profile to a network share. This is the way I’ve attacked it in the new video I’ve recorded. This article is intended to supplement that – and if you choose to do it the old-fashioned way, by copying an existing profile directly into a network share, you’re going to get problems. Believe me, I’ve tried!

Pre-requisites
We need:-
a) a network share to hold our user profile
b) a Windows 10 1703 machine to create the custom default profile on
c) a functional Active Directory environment
d) Ensure this Registry value is set on your devices – HKLM\Software\Microsoft\Windows\CurrentVersion\Explorer\SpecialRoamingOverrideAllowed REG_DWORD value 1
Hopefully you should have all that checked!
The hard work – creating the mandatory profile
Build a Windows 10 1703 machine and enter Audit Mode. You trigger Audit Mode when it reaches the screen that asks you which regional layout you want, and do it by pressing Ctrl-Shift-F3. The machine will then log you in and put up a sysprep prompt – click Cancel on this.
Once logged on, customize the environment how you want your mandatory profile to look. How much or how little you do probably really depends on what you are using the mandatory profile for. If you are using it as a base for a UEM product, then you probably don’t want much customization. If you’re using it for a kiosk or similar device, you may want a lot. Some of the things I find it handy to set are browser home pages, browser search provider, “show file extensions” in Explorer, change the default view in “This PC” away from Quick Access – it’s entirely up to you how much or how little you customize. Here’s how much I did – complete with “odd” icon placement so I can tell if it has worked 🙂
Next, create an XML file with the following text:
<?xml version=”1.0″ encoding=”utf-8″?><unattend xmlns=”urn:schemas-microsoft-com:unattend”>
<settings pass=”specialize”>
<component name=”Microsoft-Windows-Shell-Setup” processorArchitecture=”amd64″ publicKeyToken=”31bf3856ad364e35″ language=”neutral” versionScope=”nonSxS” xmlns:wcm=”http://schemas.microsoft.com/WMIConfig/2002/State” xmlns:xsi=”http://www.w3.org/2001/XMLSchema-instance”>
<CopyProfile>true</CopyProfile>
</component>
</settings>
<cpi:offlineImage cpi:source=”wim:D:/sources/install.wim#Windows 10 Enterprise” xmlns:cpi=”urn:schemas-microsoft-com:cpi” />
</unattend>
Changing the settings in bold to those as required in your environment (the path to the install files, and the Windows 10 Edition)
Make a note of the XML file name and path – I normally copy it to C:\unattend.xml
Next, open an administrative command prompt and run the following command
%windir%\system32\sysprep\sysprep.exe /generalize /oobe /reboot /unattend:c:\unattend.xml
where c:\unattend.xml is the path to the XML file you created.
Now, this will restart the system and complete the installation, copying your user profile into the default user profile area.
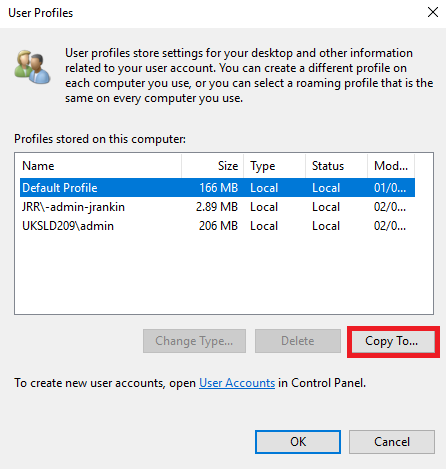
After this, I normally apply all patches and join the domain. Once this is done, log on with a domain account that has access to your network share where you intend to store the profile, and open up the Advanced System Properties dialog. Click on the Advanced tab and then Settings. Highlight the Default Profile, and click Copy To
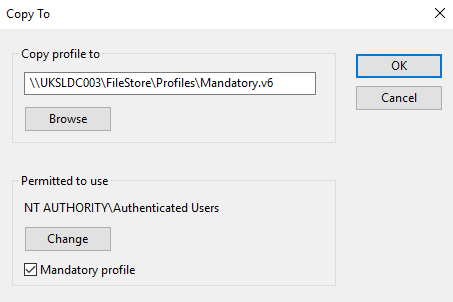
Enter the path that you wish to copy to, change Permitted to use to say Authenticated Users, and check the box for Mandatory profile (not that it appears to do anything, but hey, check it anyways)
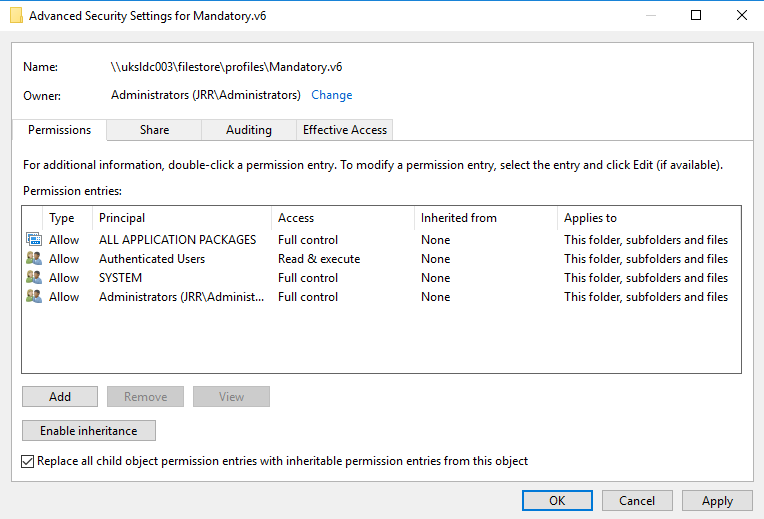
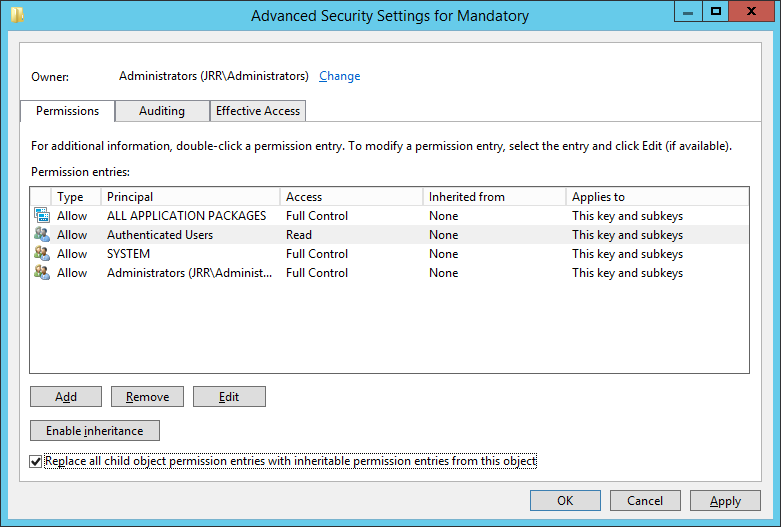
This copies the Default Profile across to our file share – but it’s not done properly, sadly. Firstly, we need to set the permissions correctly. The filesystem needs to have the permissions set as below:-
- ALL APPLICATION PACKAGES – Full Control (this is mega-important – without this set the Start Menu will fail)
- Authenticated Users – Read and Execute
- SYSTEM – Full Control
- Administrators – Full Control
Once you have set these permissions on the parent folder ENSURE that you cascade them all the way down the filesystem, and also MAKE SURE that Administrators is the owner of all the files and folders as well.
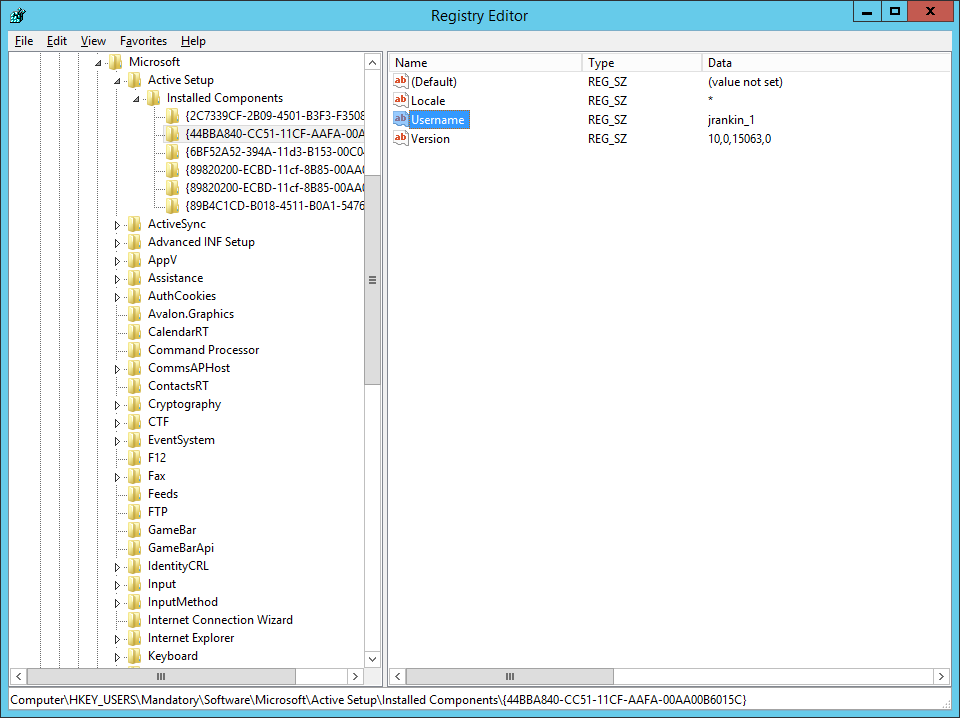
Next we need to set the Registry permissions as well. Open up regedit.exe, select the HKEY_USERS hive, and choose the Load Hive option from the File menu. Browse to the network share where you copied the files to, and open up the ntuser.dat file that is in there. Give it a name, and you will see the named hive loaded under HKEY_USERS.
Right-click on the root of the hive you have loaded and select Permissions. The permissions in here will be wrong. Change them to match those set below exactly.
You must ensure that the RESTRICTED group is removed, otherwise you will be unable to log on and will get an Access Denied error. When you apply these permissions, you will get an error saying “unable to set security in some keys” – just ignore this.
Now, search the Registry hive for any instances of the username and delete them. If you want to be really thorough, search for the SID of the user too and remove any references to that.
After this I normally delete any Registry keys which I think are unnecessary. Policies keys can definitely go, I also tend to remove APPDATALOW from \Software and the (huge amount!) of Google references you will find within the Registry. It’s up to you how much you do here – certainly there are lots of redundant objects related to gaming, XBox and SkyDrive that could easily be taken out.
Once you’ve done this, highlight the root of the loaded hive again and choose File | Unload Hive from the menu in regedit.exe, otherwise you will lock the file and it will be unusable – VERY IMPORTANT!
After this, you can highlight the Registry transaction logs in the root of your file share and delete them – they’re not needed.
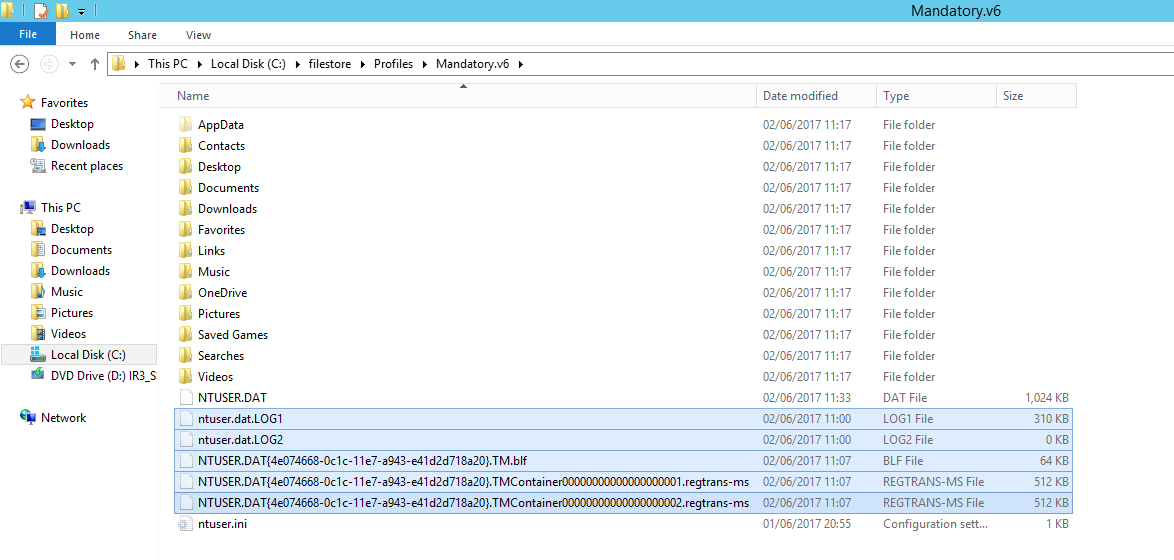
Next you can strim down the filesystem. Because the Copy Profile command ignores the AppData\Local and AppData\LocalLow folders, you shouldn’t have too much to do here. I normally just get rid of \AppData\Roaming\Adobe.
This usually takes the size of the mandatory profile down to just over 1MB, which is about right.
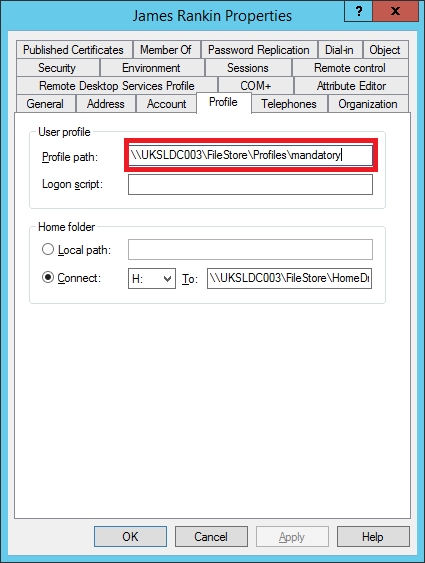
For the penultimate steps, rename the ntuser.dat file to ntuser.man (why the hell did the Mandatory check box not do this bit????), and then set a test user to use the mandatory profile in AD or GPO.
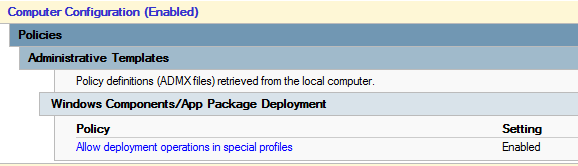
But there is one final step we need to take to ensure that UWP apps work in our mandatory profile. You need to set a GPO that allows roaming profiles (because mandatory profiles are simply read-only roaming profiles) to deploy UWP apps. The GPO is shown below, and if this isn’t set, no UWP apps will work (they will just hang indefinitely)
Once you’ve got this set, you can now test your mandatory profile – and it should work perfectly. If you want to reduce the logon time, then removing as many UWP apps as possible from the image will be your best bet – see many of my other articles for guides on how to do this.
Summary
I’m hoping this is the last time I have to go down the mandatory profiles route. But I’m willing to bet it’s not. Welcome to Windows 10 and the fast release schedule!

