
I’ve done a lot of talking recently and in most of it, I’ve been trying to impress upon people the importance of that subjective and almost intangible quality called user experience. But one of the more tangible aspects of user experience is undoubtedly performance, and particularly on shared session systems such as Citrix’s XenApp or XenDesktop platforms, it becomes absolutely critical.
At the Citrix User Group in Newcastle recently one of the presenters was Thomas Poppelgaard, a member of the CTP program and an affable guy who I had a few beers with on the first night of BriForum. One of the very interesting takeaways from his session was the fact that he reported most GPU usage was down to browsers, rather than the usual suspects such as AutoCAD and other graphics-intensive applications. His summing up of this issue was quite simply “deploy an ad blocker to see improved performance”, so I took his advice on board and decided to see how difficult it was to deploy an ad-blocking piece of software to the machines in my lab.
Lots of ads these days not only are animated (hogging performance), but they also connect up to third-party sites that could potentially be compromised, so they’re part of the system attack surface also. So not only are we looking to improve performance for our users (and in heavily-loaded XenApp environments, every CPU cycle and byte of memory counts!), but we’re also looking to improve system security – a good double-edged approach if ever there was one.
The server I worked on was a Server 2012 R2 build, fully patched, naturally with Internet Explorer 11 as the browser, running XenApp 7.6. I also tested this against a Windows 7 machine to see if it was nice and portable. I (surprisingly) used AppSense DesktopNow to deploy the required settings, but I’ve also demonstrated how they can be done through standard tools like Group Policy. The server we’re using for the first round of testing also has a bunch of GPOs applied to it, mainly regular stuff, such as loopback processing, removal of roaming profiles, RDP enablement, and enabling new IE add-ons.
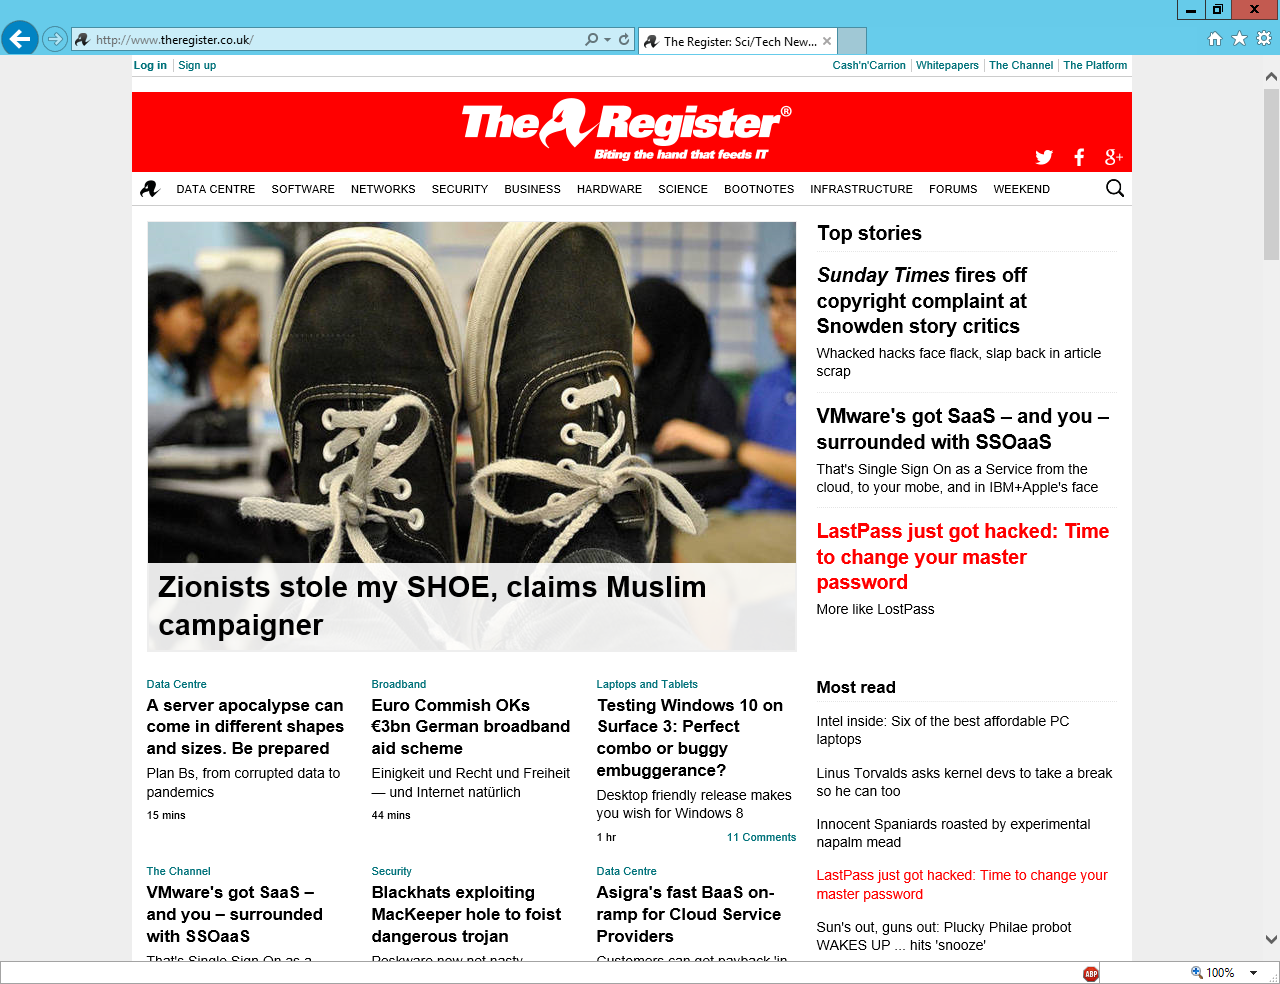
The website I chose to test on was my old faithful I.T. newsstand The Register, which I have noticed puts out a lot of banner ads, often involving animation.
What to use?
My first thought was the old trusty ad-blocking plugin AdBlock Plus, as I have used this in Firefox for many years with great success. However, this not only raises issues of deployment and configuration in an automated fashion, it also requires an installer, which was difficult (but not impossible!) to find. Add to this the fact that ABP is controlled by specific .json files rather than Registry keys, and it seemed like it would quite quickly become difficult to manage in an enterprise environment.
So it was quite surprising when I discovered that ad-blocking (or content filtering, to give it the correct term) had been part of Internet Explorer since IE9 in the form of Tracking Protection. Originally I suspected that Tracking Protection simply prevented websites from offloading your data to third-party websites (which is probably why I ignored it), but I was pleasantly surprised to find it did allow you to block content using an add-on called a Tracking Protection List (TPL). You can use the same list as Ad-Block Plus (the EasyList, which is the one we’ll use), so if you are using Firefox or Chrome with ABP you can configure the same level of protection for Internet Explorer using the built-in tools.
Here’s The Register in its default ad-ridden glory (with the ads highlighted, just in case you didn’t notice them)

here it is with Tracking Protection enabled (or ABP – either way you’d get the same result)
Obviously if you’re not using Internet Explorer as your browser you’d have to resort to something like ABP, but in my experience a lot of enterprises are still tied to Microsoft’s default browser, so I’ve left other browsers outside of the scope of this article.
So Tracking Protection it is – how do we configure this for our XenApp users?
Enabling Tracking Protection
As with most things Microsoft these days, it isn’t that easy. Microsoft get a bad press on this blog…but they deserve it. I’m not a Microsoft hater – I think a lot of their products are excellent – but they really don’t make things easy for users and administrators sometimes.
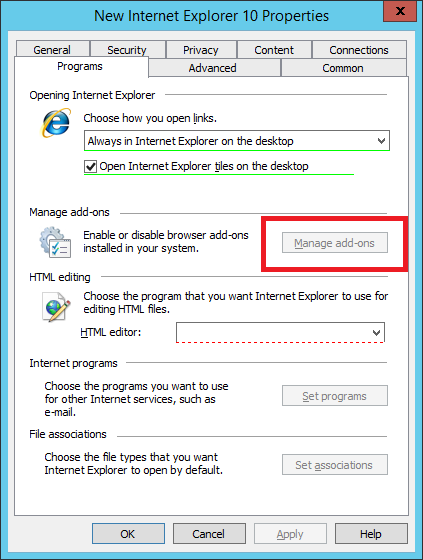
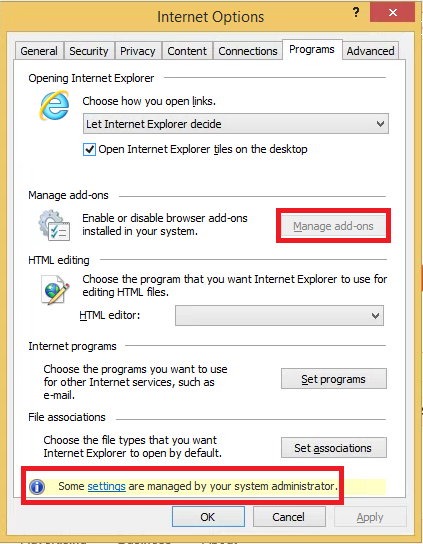
For starters, there was a GPO to configure Tracking Protection in IE9 – but this was then removed in IE10. You could also previously configure Add-Ons through Group Policy Preferences – but this functionality also appears to have been deprecated (see image)
Resorting to tried-and-tested techniques, what we are going to do is log on to the server through a XenApp published desktop, enable Tracking Protection with the EasyList, and then export out the relevant files and Registry values by using Process Monitor to view them. You’ve never had a truly satisfying day at work unless you’ve broken out a bit of Process Monitor 🙂
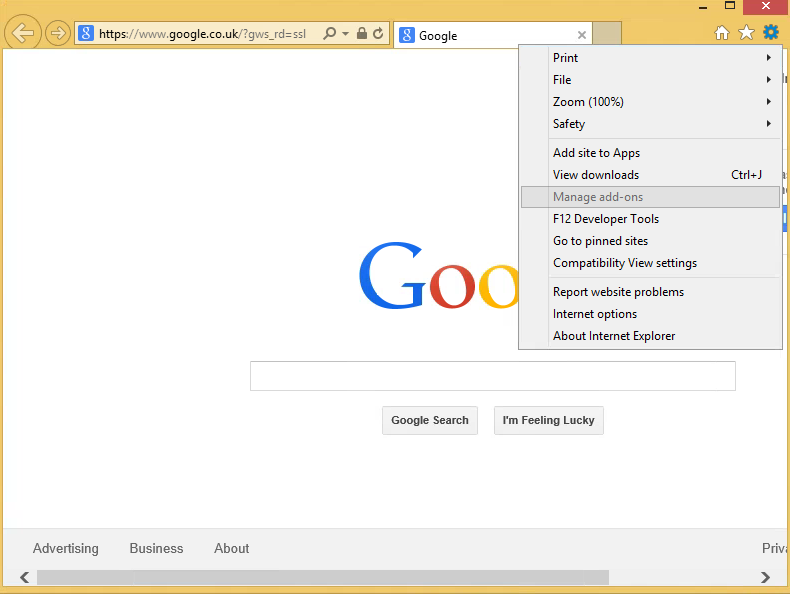
Log on, fire up IE11, and then click on the Tools icon in the top right (the “gear” icon that for some reason brings back shades of Resident Evil to me). Select Manage Add-Ons from the resultant menu, and click on Tracking Protection in the list of Add-On Types.
Then click on Get a Tracking Protection List Online, and from the web page that appears, select one (EasyList Standard at the top being the one AdBlock Plus uses, and the one I’d recommend). Click on Add List from the dialog box, and you’re done (although you may have to close the Manage Add-ons dialog and reopen it before you see it added in there).

So now we just need to see what Process Monitor shows us…
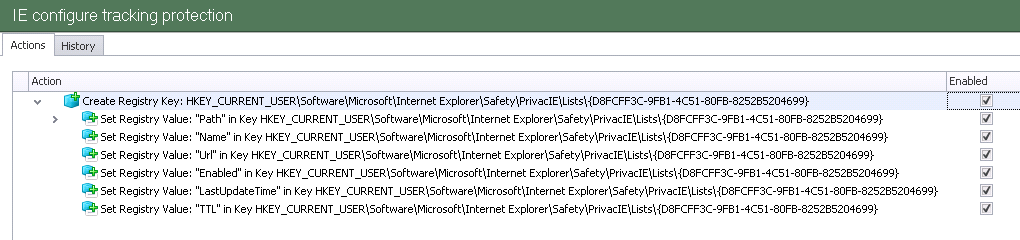
…and we get a bunch of Registry values and filesystem entries that look kind of promising. First we find is
HKCU\Software\Microsoft\Internet Explorer\Safety\PrivacIE\Lists\{GUID}
which looks like a good key, especially considering that it contains an entry pointing to the exact same filesystem entry that Process Monitor shows us, which is
%LOCALAPPDATA%\Microsoft\Internet Explorer\Tracking Protection
which contains a .tpl file, and given that we’re dealing with Tracking Protection Lists, seems very interesting!
So what we need to do is
1. Export out the Registry values from the Lists key and import them in when the user logs in
2. Copy out the .tpl file from the profile and copy it in when the user logs in
Hopefully these will automatically enable the TPL and allow us to block content using the EasyList without any user action being required.
Deploying the Registry values and filesystem entries
Now it’s a case of pick your poison. Given my history, we will cover doing this through AppSense DesktopNow Environment Manager, and also Group Policy Preferences – but there’s probably a multitude of ways to get this done, choose the one that’s easiest for your own environment.
Registry entries
Deploying these through AppSense Environment Manager is nice and easy – use the logged-on user we currently have with the settings enabled, and export them out to a file through regedit.exe, before using the Import A Registry File function in Environment Manager
Group Policy Preferences also has a similar function, the Registry Wizard, under User Config | Preferences | Windows Settings | Registry. Use this to browse to the local or remote Registry location and bring in the settings (make sure to select all the values in the key!)

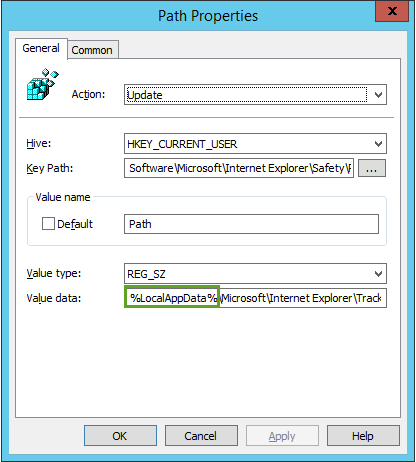
Whichever method you use, make sure you change the data for the Path value from the default (which in our case is this)
C:\Users\jrankin\AppData\Local\Microsoft\Internet Explorer\Tracking Protection\{GUID}.tpl
to the path with the %LOCALAPPDATA% variable
%LOCALAPPDATA%\Microsoft\Internet Explorer\Tracking Protection\{GUID}.tpl
and also make sure that the Type for the Path value is correctly set to be REG_EXPAND_SZ rather than just REG_SZ. Also, as pointed out by Jonathan Pitre, you may need to use the %LOCALAPPDATA% variable in the Path value to get this working properly – see image below.
Filesystem entries
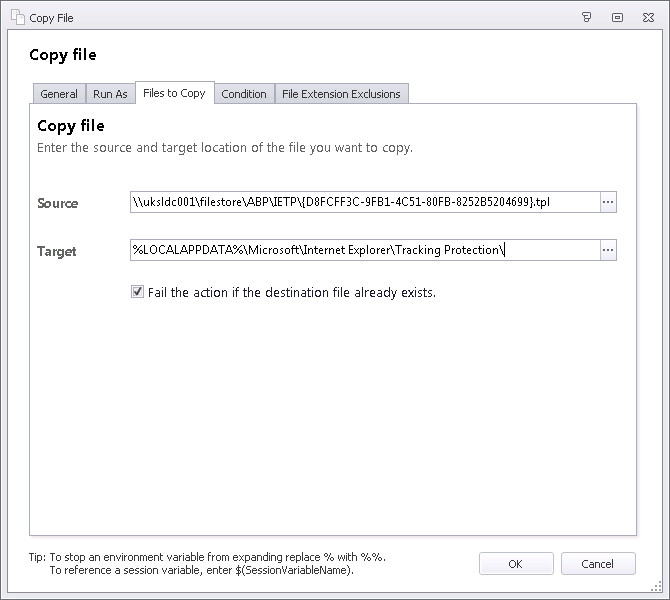
Obviously, seeing as though one of the Registry values points to the .tpl file in the %LOCALAPPDATA% path, we need to make sure the file is present when the user needs it.
First make sure we’ve grabbed the original .tpl file that we created when we configured Tracking Protection and copied it somewhere (network share, or local to the machine).
Using AppSense, we can easily fire up a File Copy Action to handle this
It’s also easy enough to do this in Group Policy Preferences using User Config | Preferences | Windows Settings |Files

So now we’ve got the files and Registry entries in place, we just need to make sure that the user can’t mess with the add-ons. Usually I do this with the Group Policy Object “Do not allow users to enable or disable add-ons“, deployed through AppSense EM or standard AD Group Policy.

However, an oddity I noted was that this GPO simply disables the entry point in Internet Options (see below)
…whereas the option for Tools | Manage Add-ons is still very much active, even with this GPO in place, not just from the “gear” icon, but also from the Tools menu (which you can reveal by pressing Alt)

This isn’t something that can be easily gotten around unless you’re using a piece of software like AppSense, which can be used to selectively disable this part of the interface (see image below for an example of the interface with the Lockdown applied). In this case, we’ve disabled the Manage Add-ons item under the Tools button, and the Manage Add-ons item on the Tools menu. We could even go so far as to disable the Alt-X keystroke (the Tools shortcut key) within iexplore.exe, but with the options disabled this isn’t necessary.
If you’re not using something like AppSense EM, you will have to face up to the fact that savvy users may be able to get in and change the Tracking Protection settings, but as long as you use something like Group Policy Preferences (preferably in its aggressive “Replace” mode) to overwrite the files and Registry values at every refresh interval, the chances of this being a big issue should be somewhat minimized.
Demonstration
So, we’ve configured our Tracking Protection, exported out the settings, and delivered them through the method of our choice. Does it work, and more importantly, does it look like it improves system performance?
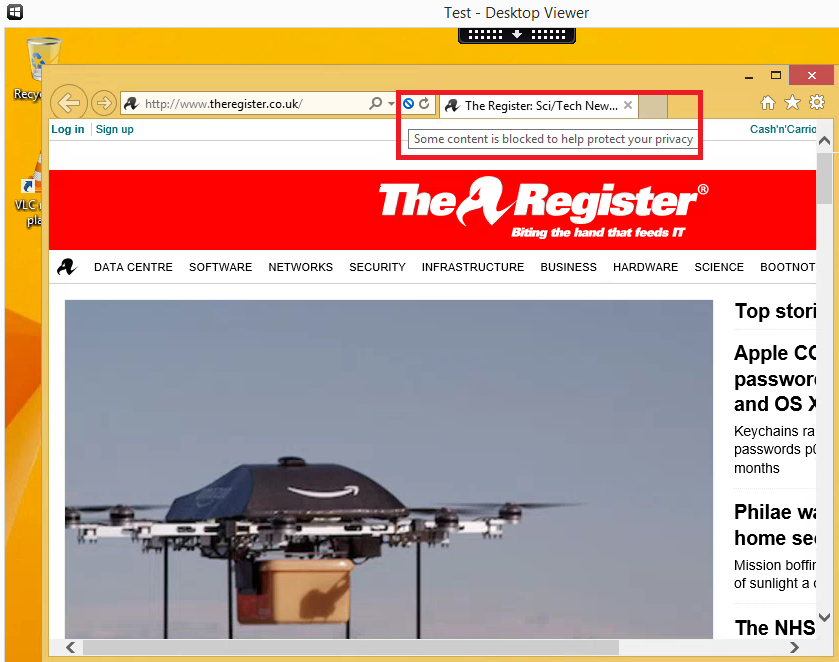
When I log in to the XenApp server, I can see that the files and Registry values are present, and the EasyList is configured correctly. Excellent! But more importantly, it blocks the ads on The Register (the little “content filter” icon – highlighted in the image below – proves that it is working)
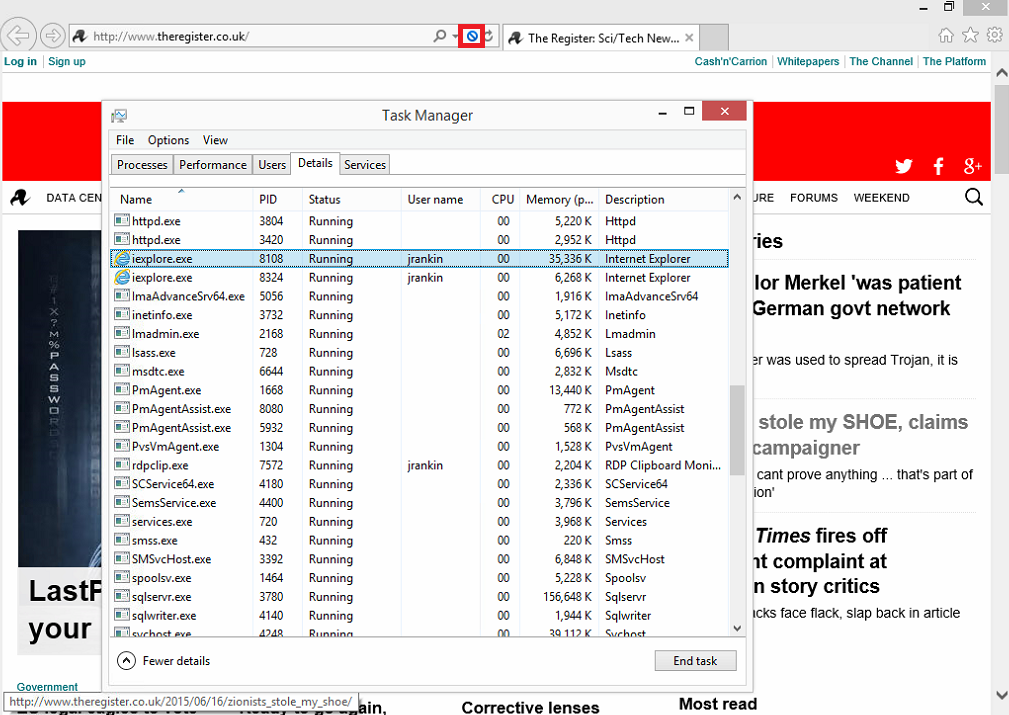
But now let’s look at a quick snapshot of system performance with the Tracking Protection enabled and the same website displayed. We grabbed a sample of the VM performance from Task Manager on ten occasions, and the average was about 30-45MB of memory and very low (almost constantly zero) CPU usage (see below)
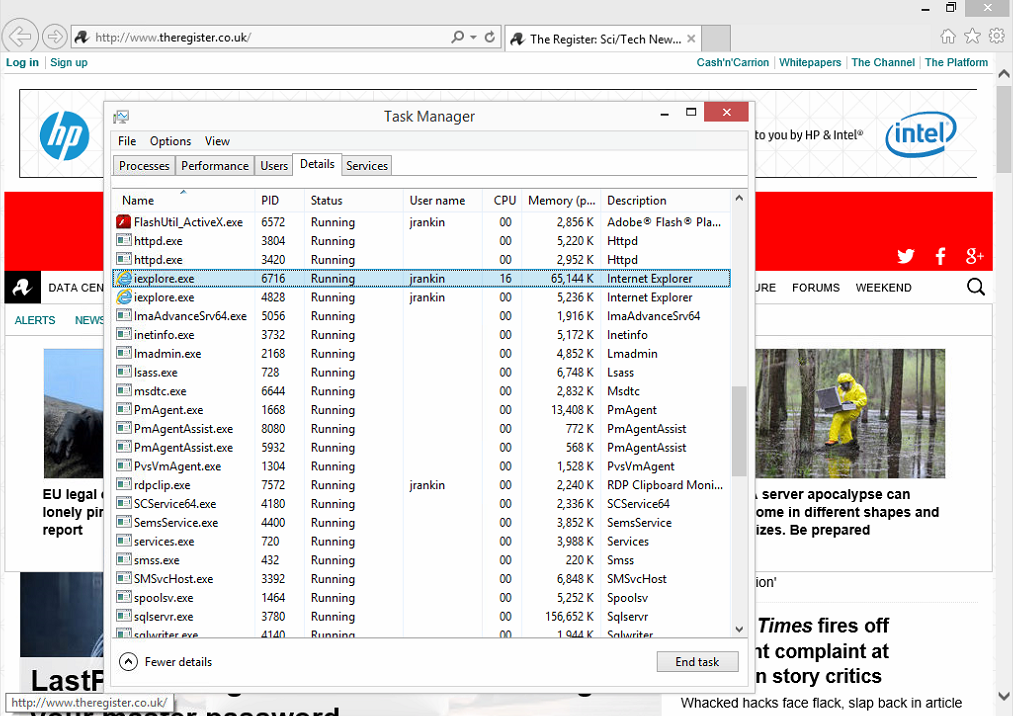
Now we will disable the Tracking Protection and grab ten quick samples again using the same web page. The average was now in the 65-75MB range for memory, and the CPU usage was a lot less static, jumping from 0 up to 20% (see below).
So that looks very promising indeed – less drain on CPU and memory resources on a per-session basis, which in a XenApp shared session environment should give you a performance boost and/or higher user density, both of which are good things!
Finally, we dropped the configuration onto a Windows 7 machine to see if it was nice and portable (obviously running IE9 or higher, otherwise Tracking Protection would be non-existent), and it did indeed work exactly as it did on the 2012 R2 XenApp server. Sweet!
Summary
So, it indeed looks as if blocking ads, in this day and age, is a good way of getting a performance boost out of your XenApp (or other shared-environment) systems.
There is always the problem that the Tracking Protection list may block some functionality of some internal websites (although all my testing didn’t demonstrate this even once, to be fair), so if you do encounter some oddness, you may need to go in and edit the list directly in the .tpl file (which looks less than straightforward, if I’m honest).
And obviously this only applies to IE – if you wanted to extend this to Chrome or Firefox or A.N.Other browser, then you’d have to look at AdBlock Plus or similar plugin. However, as far as I can tell there aren’t Registry values or file entries that can control the behaviour of ABP (most pertinently, the functionality that allows users to bypass it), so you may find working with ABP in an enterprise environment slightly more challenging, although certainly very doable.
Anyway, here’s hoping that this may be of use to those of you with XenApp environments that are fighting the never-ending battle of trying to make your user’s lives easier.
Update
Hans Straat has taken what we’ve used here and showed how it can also be done using RES Workspace Manager, see http://www.datacrash.net/post/2015/06/18/Disable-adds-with-the-help-of-Res-Workspace-Manager.aspx, nice work Hans!
More updates
The GPP config I used to set this up is downloadable here (change the path to the source tpl file to match your own environment, and obviously update the GUID if you have a different one!)
Also, after doing a session on this at the London Citrix User Group I put together a video showing it in action and being set up
There is also this PowerShell script I seem to have found that appears to be for automatically updating the TPL file
# Change <domain FQDN> to your actual domain. And you might want to change the destination =)
# I put it into a scheduled task to run nightly
$outputdir = “\\<domain FQDN>\netlogon\Scripts\ABP_TPL”
$url = “http://easylist-msie.adblockplus.org/easylist.tpl”
$output = “$outputdir\{119A9DFB-B795-4CF4-AFB4-B6B7EE6F2071}.tpl”$wc = New-Object System.Net.WebClient
$wc.DownloadFile($url, $output)
I am assuming this was sent to me from Tim in the comments. Apologies, I must have forgotten all about receiving it!
Kudos due to Thomas Poppelgaard for his user group session that made me think of ad-blocking as a way to improve Citrix session performance, and also for Tim for contributing the PowerShell!

